LightBlog

dimanche 26 décembre 2021

BLUETTI Unveils World’s First Sodium-ion Solar Generator

As climate change continues to push industries into a carbon-neutral world, the need for renewable energy systems is growing rapidly. Technology like chemical batteries and battery-powered machines are in high demand. Due to the increase in the need for lithium, there is a supply crunch for these types of batteries. This is why BLUETTI started looking into using sodium instead of lithium, for their next generation of power stations. Sodium and lithium are the closest metals in the same group with very similar chemical properties, and there is over one thousand times the sodium than lithium in the Earth’s crust. Now BLUETTI is unveiling the world’s first sodium-ion solar generator.

BLUETTI is the world’s leading manufacturer of solar energy products like generators, photovoltaic panels, and related accessories. In the most recent two years, BLUETTI has launched residential power stations like the AC200P, EP500, and AC300. These products have been a favorite among consumers and continue to be some of the best power stations on the market. Now, BLUETTI ventures to integrate the innovative sodium-ion battery technology into its upcoming solar products.

This new sodium-based technology will make its first appearance in the world’s first sodium-ion solar generator-NA300. Along with this generator, they will be launching a compatible battery pack – B480.

The NA300 Solar Generator and B480 Battery Pack

These new products will have the same style and appearance as the previous options like the EP500 Pro. You’ll find four 20A plugs and one 30A L14-30 output port driven by the built-in 3,000W pure sine wave inverter to juice up most household electrical appliances. The NA300 will see an upgrade over the EP500 Pro’s incredible 2,400W solar input to 3,000W. This could end up being the fastest charging solar generator since it can be recharged from 0% to 80% in a short half-hour using 6,000W swift AC + PV dual charging.

While there are many benefits to the new sodium-based technology, it comes with its limitations as well. The NA300 provides a capacity of 3,000Wh, less than the 5,100Wh of EP500 Pro. Despite them being the same size, the current sodium-ion battery technology limitations result in a smaller capacity. You can get a significant increase in capacity by pairing up to two B480 battery modules (4,800Wh each) for a whopping total capacity of 12,600Wh. This can provide the average family with up to a week of emergency electricity if the power goes out.

The first-generation sodium-ion battery rivals the LiFePO4 battery cells widely used in other BLUETTI products in security and long cycle life except for the low energy density; yet the former excels in terms of cost, low-temperature performance, quick-charging, and other electrochemical aspects because of its chemical characteristics. BLUETTI’s sodium-ion battery can charge in less than 30 minutes to 80% SOC at room temperature. Besides, in a low-temperature environment of -20°C (-4℉), this sodium-ion battery pack in NA300 and B480 has a capacity retention rate of more than 85% and provides a system integration efficiency of over 80%, which is perfect for powering in winter or in regions with extremely low temperatures.

Find out more information about all of BLUETTI’s products at www.bluettipower.com.

We thank Bluetti for sponsoring this post. Our sponsors help us pay for the many costs associated with running XDA, including server costs, full time developers, news writers, and much more. While you might see sponsored content (which will always be labeled as such) alongside Portal content, the Portal team is in no way responsible for these posts. Sponsored content, advertising and XDA Depot are managed by a separate team entirely. XDA will never compromise its journalistic integrity by accepting money to write favorably about a company, or alter our opinions or views in any way. Our opinion cannot be bought.

The post BLUETTI Unveils World’s First Sodium-ion Solar Generator appeared first on xda-developers.


from xda-developers https://ift.tt/3en7LN4
via IFTTT

samedi 25 décembre 2021

“Android TV Remote” is an unofficial remote app for your Android TV

Losing your remote control is never fun, especially when all you want to do is sit back on your couch and enjoy your favorite show. Thankfully for Android TV users, Google offers a fallback option in the form of a virtual remote that you can find in the Google Home app. While it’s a handy option when your remote is lost, it’s quite basic in terms of what it can do. This is where “Android TV Remote” comes into play.

Android TV Remote is an unofficial remote app for your Android TV devices. It comes from the same developer that made Freebox Remote, which recently came to the spotlight, as it can also be used on Google TV devices. But using the Freebox Remote app to control an Android TV device requires a workaround, so the developer decided to release a standalone app that does exactly that.

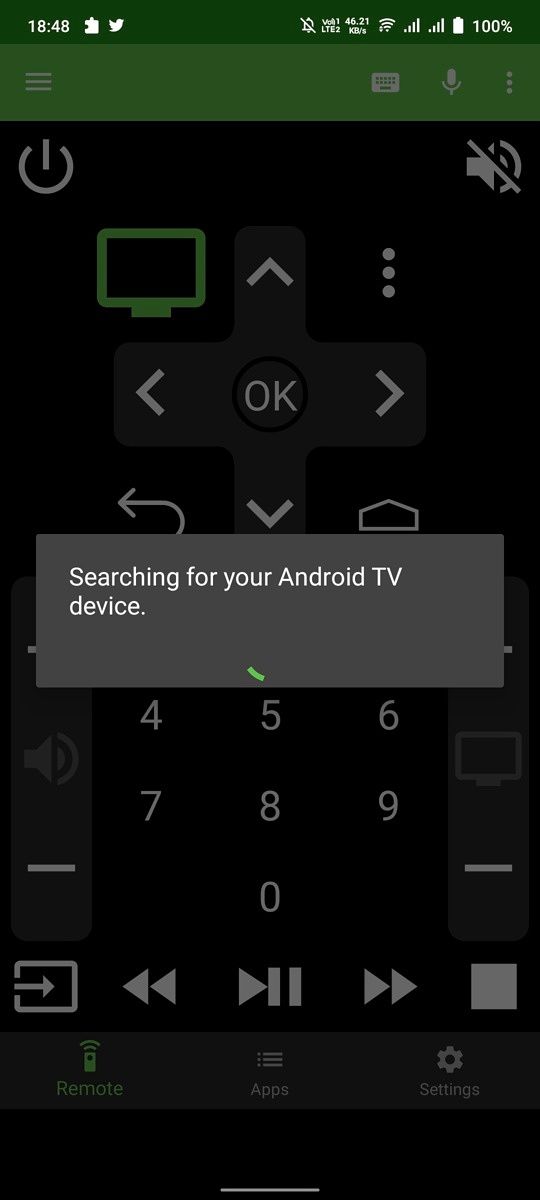
Android TV Remote is a pretty straightforward app and works with pretty much all Android TV versions. All essential buttons, including a D-pad, are present on the main screen. In addition, the app also has a dedicated Apps list that lets you launch your favorite streaming service with a single click.

The current version lacks widget support. Hopefully, this is something that can be added in a future update, allowing users to control their Android TV/Google TV device without having to open the app.

Google used to offer a dedicated app for controlling Android TV devices on your local network. However, the company pulled the app from Google Play Store this year and has slowly been porting its features to other apps. The Google TV app gained a remote control back in September, with the Google Home app picking up the same feature a month later.

If you want to give the Android TV Remote app a shot, you can download it from the Google Play Store by following the link below.

Android TV Remote (Free+, Google Play) →

Thanks to Mishaal Rahman for the tip!

The post “Android TV Remote” is an unofficial remote app for your Android TV appeared first on xda-developers.


from xda-developers https://ift.tt/3swXbvf
via IFTTT

“Android TV Remote” is an unofficial remote app for your Android TV

Losing your remote control is never fun, especially when all you want to do is sit back on your couch and enjoy your favorite show. Thankfully for Android TV users, Google offers a fallback option in the form of a virtual remote that you can find in the Google Home app. While it’s a handy option when your remote is lost, it’s quite basic in terms of what it can do. This is where “Android TV Remote” comes into play.

Android TV Remote is an unofficial remote app for your Android TV devices. It comes from the same developer that made Freebox Remote, which recently came to the spotlight, as it can also be used on Google TV devices. But using the Freebox Remote app to control an Android TV device requires a workaround, so the developer decided to release a standalone app that does exactly that.

Android TV Remote is a pretty straightforward app and works with pretty much all Android TV versions. All essential buttons, including a D-pad, are present on the main screen. In addition, the app also has a dedicated Apps list that lets you launch your favorite streaming service with a single click.

The current version lacks widget support. Hopefully, this is something that can be added in a future update, allowing users to control their Android TV/Google TV device without having to open the app.

Google used to offer a dedicated app for controlling Android TV devices on your local network. However, the company pulled the app from Google Play Store this year and has slowly been porting its features to other apps. The Google TV app gained a remote control back in September, with the Google Home app picking up the same feature a month later.

If you want to give the Android TV Remote app a shot, you can download it from the Google Play Store by following the link below.

Android TV Remote (Free+, Google Play) →

Thanks to Mishaal Rahman for the tip!

The post “Android TV Remote” is an unofficial remote app for your Android TV appeared first on xda-developers.


from xda-developers https://ift.tt/3swXbvf
via IFTTT

First 10 things to do with a new Apple Watch

The Apple Watch is one of the company’s greatest products and a device that dominates the wearables domain. Whether you’re looking for a fitness companion or more than just that, there’s an Apple Watch for you. This smartwatch is packed with features and sensors, and plenty of people aren’t sure where to start or how to make the most out of it. Whether you’ve bought or received one as a gift, our aim is to help you get started. Here are the first 10 things to do with a new Apple Watch.

Navigate this article:

  1. Learn how to control it
  2. Choose a watch face
  3. Select the complications that matter to you
  4. Change the app layout
  5. Add your vaccination certificate to it
  6. Silence its audible alerts
  7. Set your activity goals
  8. Learn how to shower or swim with it
  9. Add your friends to the Fitness app to compete
  10. Change the default band and protect it with a case
    Apple Watch Series 7 (GPS)
    This is the GPS variant of the Apple Watch Series 7, the company's latest WiFi-only smartwatch.
    Apple Watch Series 7 (GPS + Cellular)
    This is the GPS + Cellular variant of the Apple Watch Series 7, the company's latest 4G-enabled smartwatch.

1. Learn how to control it

No notifications on Apple Watch

When you first pair an Apple Watch with an iPhone, you must learn how to navigate around watchOS. Just like on iOS, a swipe down from the top of the screen will show the notifications. Swiping up from the bottom of the screen will show the Control Center. There you will be able to add, remove, and reorder the toggles based on your preferences. A swipe to the right or left on the main screen will switch between the added watch faces.

When it comes to hardware, the Apple Watch has a side button and a digital crown. A single click on the side button will show the recent or favorite app — depending on your settings. A double click will reveal the cards saved in Apple Wallet. Holding the side button will bring up a menu that includes the power button, Medical ID, and Emergency SOS.

The digital crown is used to scroll through lists and zoom in/out on certain elements. If you click it, though, It will show you the installed apps if you’re on the main screen. If you’re inside an app, it’ll take you to the main screen instead. Finally, double-clicking it will take you to the most recently used app. It might sound like a complicated mechanism, but your muscle memory will adapt faster than you’d expect.

2. Choose a watch face

Apple Watch watch faces

Choosing a watch face that matches your taste and style is one of the first things you should do after getting an Apple Watch. The company provides you with diverse options to choose from. However, it still doesn’t support custom watch faces. So you’re limited to the ones available on watchOS by default. To change it, just go to the Watch app on your iPhone, click on the Face Gallery tab in the middle of the bottom navigation bar, and click on the face you like. Once you’re in a face, you’ll get to customize some aspects about it, such as the colors and complications. When you’re done with that, tap on the Add button, and it’ll instantly change on your watch. You can have as many watch faces as you want, and you can easily swipe between them (horizontally) on your watch’s main screen.

3. Select the complications that matter to you

Random complications on Apple Watch face

Apple and third-party developers offer plenty of complications to take advantage of. What are complications? See them as watch face accessories that provide timely information or shortcuts to certain apps. Care about the weather? There’s a complication for that. Interested in certain stocks? There’s also one for that. Curious about the sunrise/sunset times? You’ve got it!

The number of complications you can add depends on the watch face you’re using. Some support up to nine at the same. time, while other ones aren’t as generous. To choose yours, just click on an existent watch face you’re using in the Watch app on your iPhone. If you’re adding a new face, you can select the complications you want before clicking the Add button.

4. Change the app layout

Apple Watch jiggle mode

Just like on iOS, you can change the app layout on watchOS through Jiggle Mode. Just click and hold on the apps screen, then select Edit Apps. You will then be able to drag them around to reorder them and even delete some of them. Alternatively, you can use the Watch app on your iPhone to take advantage of the bigger screen. Apple Watches support both Grid and List Views — the latter is strictly alphabetical, though.

5. Add your vaccination certificate to it

Worn Apple Watch displaying vaccination QR code

We’ve reached a point where plenty of entertainment venues and airports ask for COVID vaccination proof. Digging through your files or photos to find the QR code of the certificate can be an annoyance, especially when your hands are full. That’s why we’ve prepared a guide for you on how to manually add your vaccination certificate to your Apple Wallet. This allows you to easily access it with a double click on the side button of your watch.

6. Silence its audible alerts

alarm on apple watch

Apple Watches have speakers, but plenty of us find that somewhat useless. The watch includes a Taptic Engine that provides a good level of haptic feedback when you receive a notification. So assuming you’re wearing it, you will most likely feel that. If you’re not wearing it, you can just unmute your iPhone to hear the notification alerts as they come in. The point is — the notification sounds on the Apple Watch are redundant to many of us. To silence audible alerts, just swipe up to open the Control Center and hit on the bell icon. You can also set a silent but vibrating alarm on your Apple Watch to avoid waking up startled.

7. Set your activity goals

Apple Watch activity goals

Many of us buy this watch for its health and fitness tracking features. To set or change your activity goals, head to the Activity app on your watch, scroll to the bottom, and click Change Goals. This will allow you to change how much it takes to close the Move, Exercise, and Stand rings. As a piece of advice — set realistic goals that are achievable but also slightly push you to do more. This way you will likely remain motivated to close them. As a result, you will slowly advance as you set higher goals every few weeks or months.

8. Learn how to shower or swim with it

Apple Watch water toggle

The Apple Watch is water-resistant. This means you get to shower or swim while wearing it. Before you hop into the shower, pool, or ocean, swipe up to reveal the Control Center, and click on the water drop button. This will kill the touch display so the watch doesn’t register the water drops as random clicks. This way you won’t end up accidentally iMessaging your live heartbeat to that ex you’ve forgotten to delete the number of.

Once you’re done with the shower or swim, rinse the watch with clean, non-salty water. Make sure the water enters its speaker and microphone holes. This will clear out any soap or salt stuck inside. After you’re done with rinsing it, rotate the Digital Crown until it starts beeping and ejecting the water through its speaker holes. This will unlock the touch controls again, and you will be able to use your watch normally afterward.

9. Add your friends to the Fitness app to compete

Apple Watch activity sharing

Competing with or comparing our progress to others can be very motivational. Apple allows its watch users to share their activities with their friends and family members. To do this, launch the Fitness app on your iPhone and head to the Sharing tab in the bottom right corner. Click on the icon in the top right corner and search for the contact you want to add. Click their name and send them an invitation.

Once they accept it, you will be able to view their three activity rings and the workouts they’ve done for the day. You can also challenge them by hitting the compete button inside their profiles. Competitions last for a week and are based on a points system. The person who earns more points will earn an award by the end of the 7 days.

10. Change the default band and protect it with a case

Apple Watch SE featured photo

Sometimes default watch bands can get boring. Fortunately, Apple and third-parties sell alternative ones. You can change the bands by taking the watch off, and sliding the bands out as you click and hold on to the tiny buttons on the back that secure them in. Afterward, slide the new bands in and you’re good to go!

A case can make an Apple Watch look hefty, but it’s worth it if you tend to bump your wrist into hard objections. Cracking the screen will take away its premium look, and you wouldn’t wanna do that to your brand new watch. To spare you the endless dilemmas of having to choose the color, style, and material, we have compiled for you a list that narrows you down to the best watch bands and cases available out there.


The Apple Watch is a feature-rich device that will slowly turn into a companion you can’t leave behind. It provides accurate health and fitness-related measurements and pushes you to do more. Not only that, but it also tightly integrates into Apple’s ecosystem, allowing you to do things like unlocking your Face ID iPhone when masked and your Mac. It truly is a small but handy bundle of might.

What is your favorite Apple Watch feature? Let us know in the comments section below.

The post First 10 things to do with a new Apple Watch appeared first on xda-developers.


from xda-developers https://ift.tt/3Hbb3PN
via IFTTT

First 10 things to do with a new Apple Watch

The Apple Watch is one of the company’s greatest products and a device that dominates the wearables domain. Whether you’re looking for a fitness companion or more than just that, there’s an Apple Watch for you. This smartwatch is packed with features and sensors, and plenty of people aren’t sure where to start or how to make the most out of it. Whether you’ve bought or received one as a gift, our aim is to help you get started. Here are the first 10 things to do with a new Apple Watch.

Navigate this article:

  1. Learn how to control it
  2. Choose a watch face
  3. Select the complications that matter to you
  4. Change the app layout
  5. Add your vaccination certificate to it
  6. Silence its audible alerts
  7. Set your activity goals
  8. Learn how to shower or swim with it
  9. Add your friends to the Fitness app to compete
  10. Change the default band and protect it with a case
    Apple Watch Series 7 (GPS)
    This is the GPS variant of the Apple Watch Series 7, the company's latest WiFi-only smartwatch.
    Apple Watch Series 7 (GPS + Cellular)
    This is the GPS + Cellular variant of the Apple Watch Series 7, the company's latest 4G-enabled smartwatch.

1. Learn how to control it

No notifications on Apple Watch

When you first pair an Apple Watch with an iPhone, you must learn how to navigate around watchOS. Just like on iOS, a swipe down from the top of the screen will show the notifications. Swiping up from the bottom of the screen will show the Control Center. There you will be able to add, remove, and reorder the toggles based on your preferences. A swipe to the right or left on the main screen will switch between the added watch faces.

When it comes to hardware, the Apple Watch has a side button and a digital crown. A single click on the side button will show the recent or favorite app — depending on your settings. A double click will reveal the cards saved in Apple Wallet. Holding the side button will bring up a menu that includes the power button, Medical ID, and Emergency SOS.

The digital crown is used to scroll through lists and zoom in/out on certain elements. If you click it, though, It will show you the installed apps if you’re on the main screen. If you’re inside an app, it’ll take you to the main screen instead. Finally, double-clicking it will take you to the most recently used app. It might sound like a complicated mechanism, but your muscle memory will adapt faster than you’d expect.

2. Choose a watch face

Apple Watch watch faces

Choosing a watch face that matches your taste and style is one of the first things you should do after getting an Apple Watch. The company provides you with diverse options to choose from. However, it still doesn’t support custom watch faces. So you’re limited to the ones available on watchOS by default. To change it, just go to the Watch app on your iPhone, click on the Face Gallery tab in the middle of the bottom navigation bar, and click on the face you like. Once you’re in a face, you’ll get to customize some aspects about it, such as the colors and complications. When you’re done with that, tap on the Add button, and it’ll instantly change on your watch. You can have as many watch faces as you want, and you can easily swipe between them (horizontally) on your watch’s main screen.

3. Select the complications that matter to you

Random complications on Apple Watch face

Apple and third-party developers offer plenty of complications to take advantage of. What are complications? See them as watch face accessories that provide timely information or shortcuts to certain apps. Care about the weather? There’s a complication for that. Interested in certain stocks? There’s also one for that. Curious about the sunrise/sunset times? You’ve got it!

The number of complications you can add depends on the watch face you’re using. Some support up to nine at the same. time, while other ones aren’t as generous. To choose yours, just click on an existent watch face you’re using in the Watch app on your iPhone. If you’re adding a new face, you can select the complications you want before clicking the Add button.

4. Change the app layout

Apple Watch jiggle mode

Just like on iOS, you can change the app layout on watchOS through Jiggle Mode. Just click and hold on the apps screen, then select Edit Apps. You will then be able to drag them around to reorder them and even delete some of them. Alternatively, you can use the Watch app on your iPhone to take advantage of the bigger screen. Apple Watches support both Grid and List Views — the latter is strictly alphabetical, though.

5. Add your vaccination certificate to it

Worn Apple Watch displaying vaccination QR code

We’ve reached a point where plenty of entertainment venues and airports ask for COVID vaccination proof. Digging through your files or photos to find the QR code of the certificate can be an annoyance, especially when your hands are full. That’s why we’ve prepared a guide for you on how to manually add your vaccination certificate to your Apple Wallet. This allows you to easily access it with a double click on the side button of your watch.

6. Silence its audible alerts

alarm on apple watch

Apple Watches have speakers, but plenty of us find that somewhat useless. The watch includes a Taptic Engine that provides a good level of haptic feedback when you receive a notification. So assuming you’re wearing it, you will most likely feel that. If you’re not wearing it, you can just unmute your iPhone to hear the notification alerts as they come in. The point is — the notification sounds on the Apple Watch are redundant to many of us. To silence audible alerts, just swipe up to open the Control Center and hit on the bell icon. You can also set a silent but vibrating alarm on your Apple Watch to avoid waking up startled.

7. Set your activity goals

Apple Watch activity goals

Many of us buy this watch for its health and fitness tracking features. To set or change your activity goals, head to the Activity app on your watch, scroll to the bottom, and click Change Goals. This will allow you to change how much it takes to close the Move, Exercise, and Stand rings. As a piece of advice — set realistic goals that are achievable but also slightly push you to do more. This way you will likely remain motivated to close them. As a result, you will slowly advance as you set higher goals every few weeks or months.

8. Learn how to shower or swim with it

Apple Watch water toggle

The Apple Watch is water-resistant. This means you get to shower or swim while wearing it. Before you hop into the shower, pool, or ocean, swipe up to reveal the Control Center, and click on the water drop button. This will kill the touch display so the watch doesn’t register the water drops as random clicks. This way you won’t end up accidentally iMessaging your live heartbeat to that ex you’ve forgotten to delete the number of.

Once you’re done with the shower or swim, rinse the watch with clean, non-salty water. Make sure the water enters its speaker and microphone holes. This will clear out any soap or salt stuck inside. After you’re done with rinsing it, rotate the Digital Crown until it starts beeping and ejecting the water through its speaker holes. This will unlock the touch controls again, and you will be able to use your watch normally afterward.

9. Add your friends to the Fitness app to compete

Apple Watch activity sharing

Competing with or comparing our progress to others can be very motivational. Apple allows its watch users to share their activities with their friends and family members. To do this, launch the Fitness app on your iPhone and head to the Sharing tab in the bottom right corner. Click on the icon in the top right corner and search for the contact you want to add. Click their name and send them an invitation.

Once they accept it, you will be able to view their three activity rings and the workouts they’ve done for the day. You can also challenge them by hitting the compete button inside their profiles. Competitions last for a week and are based on a points system. The person who earns more points will earn an award by the end of the 7 days.

10. Change the default band and protect it with a case

Apple Watch SE featured photo

Sometimes default watch bands can get boring. Fortunately, Apple and third-parties sell alternative ones. You can change the bands by taking the watch off, and sliding the bands out as you click and hold on to the tiny buttons on the back that secure them in. Afterward, slide the new bands in and you’re good to go!

A case can make an Apple Watch look hefty, but it’s worth it if you tend to bump your wrist into hard objections. Cracking the screen will take away its premium look, and you wouldn’t wanna do that to your brand new watch. To spare you the endless dilemmas of having to choose the color, style, and material, we have compiled for you a list that narrows you down to the best watch bands and cases available out there.


The Apple Watch is a feature-rich device that will slowly turn into a companion you can’t leave behind. It provides accurate health and fitness-related measurements and pushes you to do more. Not only that, but it also tightly integrates into Apple’s ecosystem, allowing you to do things like unlocking your Face ID iPhone when masked and your Mac. It truly is a small but handy bundle of might.

What is your favorite Apple Watch feature? Let us know in the comments section below.

The post First 10 things to do with a new Apple Watch appeared first on xda-developers.


from xda-developers https://ift.tt/3Hbb3PN
via IFTTT

This app lets you take back control over how Android 12 opens links

Among all the fantastic features and changes that Android 12 brings along, it also introduces some rather controversial changes. We have already talked about how Android 12’s new background app limitations can run havoc on apps like Termux. Another annoying change in Android 12 is the way it handles external links. If you’ve recently upgraded to Android 12, you probably would have noticed that when opening links, you no longer get that familiar “Open with” dialogue. Links will either automatically open in their corresponding apps or take you straight to Google Chrome or your default browser. If you’re not a fan of this change and want to restore the way things were in older Android versions, read on.

Starting with Android 12, Google now only allows “verified links” to be opened in external apps. Verified links allow app developers to ensure that only their app can handle links from their domain. If a link is non-verified, Android 12 will open it in the default browser, instead of showing you the app selection dialogue. But thankfully there’s an app called Better Open With that lets you get around Android 12’s new link handling behavior.

How to fix the handling of links on Android 12 with “Better Open With”

  • Download the “Beter Open With” app from the Play Store.
  • Now on your Android 12 phone navigate to Settings > Default apps > Browser app.

Default browser app picker

  • Set Better Open With as your default browser.
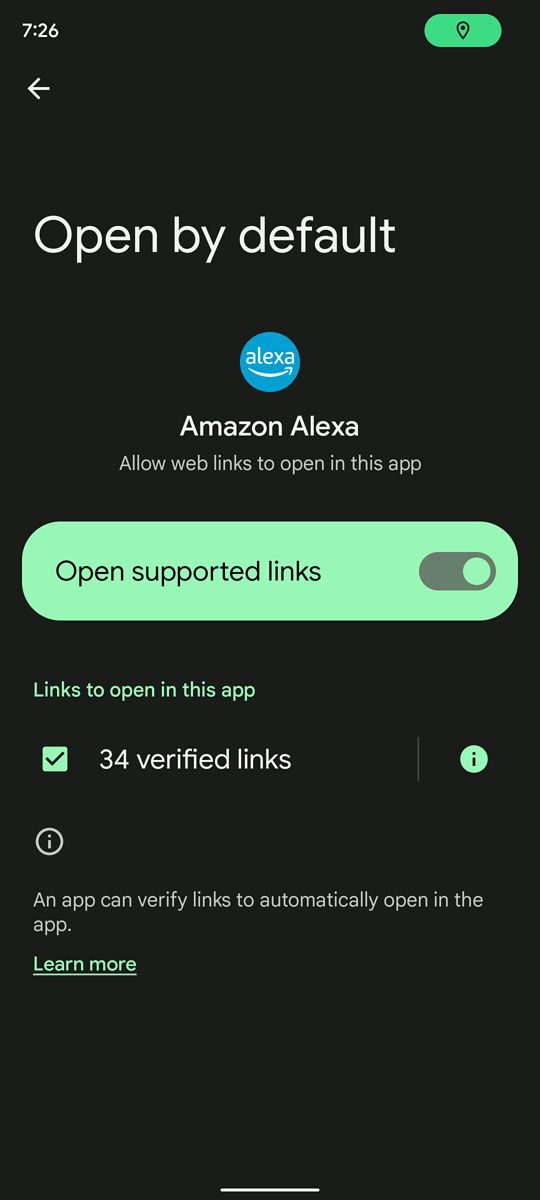
  • Now go to Settings > Default apps > Opening links and turn off the “Open supported link” toggle for every app that supports verified links.
Opening links section showing "Instant apps" and "Installed apps" OPen supported links toggle for Amazon Alexa OPen supported links toggle turned on for Amazon Alexa
  • That’s it. Now whenever you open a link, you’ll see the familiar Complete Action With dialogue listing out all the apps that can handle that link — just like in previous Android versions.

Even if you’re not running Android 12, “Better Open With” is still a great replacement for the system app chooser as it gives you more customizations and control.

Better Open With (Free, Google Play) →

The post This app lets you take back control over how Android 12 opens links appeared first on xda-developers.


from xda-developers https://ift.tt/32qnBnF
via IFTTT

This app lets you take back control over how Android 12 opens links

Among all the fantastic features and changes that Android 12 brings along, it also introduces some rather controversial changes. We have already talked about how Android 12’s new background app limitations can run havoc on apps like Termux. Another annoying change in Android 12 is the way it handles external links. If you’ve recently upgraded to Android 12, you probably would have noticed that when opening links, you no longer get that familiar “Open with” dialogue. Links will either automatically open in their corresponding apps or take you straight to Google Chrome or your default browser. If you’re not a fan of this change and want to restore the way things were in older Android versions, read on.

Starting with Android 12, Google now only allows “verified links” to be opened in external apps. Verified links allow app developers to ensure that only their app can handle links from their domain. If a link is non-verified, Android 12 will open it in the default browser, instead of showing you the app selection dialogue. But thankfully there’s an app called Better Open With that lets you get around Android 12’s new link handling behavior.

How to fix the handling of links on Android 12 with “Better Open With”

  • Download the “Beter Open With” app from the Play Store.
  • Now on your Android 12 phone navigate to Settings > Default apps > Browser app.

Default browser app picker

  • Set Better Open With as your default browser.
  • Now go to Settings > Default apps > Opening links and turn off the “Open supported link” toggle for every app that supports verified links.
Opening links section showing "Instant apps" and "Installed apps" OPen supported links toggle for Amazon Alexa OPen supported links toggle turned on for Amazon Alexa
  • That’s it. Now whenever you open a link, you’ll see the familiar Complete Action With dialogue listing out all the apps that can handle that link — just like in previous Android versions.

Even if you’re not running Android 12, “Better Open With” is still a great replacement for the system app chooser as it gives you more customizations and control.

Better Open With (Free, Google Play) →

The post This app lets you take back control over how Android 12 opens links appeared first on xda-developers.


from xda-developers https://ift.tt/32qnBnF
via IFTTT