LightBlog

mercredi 31 août 2022

Lenovo’s new IdeaPad 5i Chromebook has a fast 120Hz display

Lenovo has launched a new Chromebook, two new Android tablets, and a new series of monitors at the IFA show in Berlin. The new IdeaPad 5i Chromebook is Lenovo’s first 16-inch Chromebook with a 120Hz display. Alongside it is the second generation Tab P11 Pro and Lenovo Tab P11 which are getting slight technical improvements. Capping out the announcements are five monitors, focused on the needs of both gamers as well as those looking to stay productive.

IdeaPad 5i Chromebook

The highlight of the announcements for most people will be the IdeaPad 5i Chromebook. This is a significant addition to Lenovo’s Chromebook lineup, as it’s the first that is 16-inches in size, but it doesn’t have a launch date or price in the United States. It is a decently specced machine, though.

The IdeaPad 5i Chromebook sports a 2.5K resolution borderless display, with a refresh rate of 120Hz, which will make the content on the screen look fluent and fast. This refresh rate isn’t quite common on Chromebooks, either, which makes it extra special.

Powering the device are Intel Core i3-1215U or Intel Pentium 8505 CPUs and either 4GB or 8GB of RAM. For storage, you can choose between an eMMC or an SSD. the eMMC options include 64GB or 128GB, and traditional SSDs will come in 256GB or 512GB.

There’s also an FHD webcam on board, and two user-facing speakers for added immersive feeling. Weight comes in at 4.10 pounds and the Chromebook is about 0.8 inches thick. Ports range from 2 USB-A Type-C ports, 2 USB 3.2 Type-A ports, a headphone jack, and a MicroSD card slot.

Lenovo Tab P11 Pro (2nd Gen) and Lenovo Tab P11 (2nd Gen)

The other two addition’s in Lenovo’s IFA launch are the second generation Tab P11 Pro and Lenovo Tab P11. The Tab P11 Pro will start at $400 and will come in September 2022. The Tab P11 will start at $250 and will come in January 2023. Both of these are generational improvements with slight jumps in processing power.

The Tab P11 Pro 2nd Gen will be Lenovo’s new flagship Android tablet, replacing the first generation when launched. It keeps a lot of the same design features as the first version but gets a bump in specs. Now onboard is the MediaTek 1300T SoC which Lenovo says can offer 120% more power than the last generation. RAM and storage options will range from 4GB of RAM and 128GB of storage, 6GB of RAM and 128GB of storage, or 8GB of RAM and 256GB of storage. The screen is still bright and vibrant, keeping an 11.2-inch 2.5K resolution OLED panel with up to a 120Hz refresh rate. The optional keyboard case is also unchanged, as is the Lenovo Precision Pen 3. Ports are just a single USB Type C, which was a complaint that wasn’t addressed from the last generation.

The Lenovo Tab P11 2nd Gen is the cheaper version of the P11 Pro. It comes with the MediaTek Helio G99 under the hood, for a 50% boost in power between generations. RAM and storage options include 4GB RAM and 64GB of storage, 4GB of RAM and 128GB of storage, or 6GB of RAM and 128GB of storage. It has a slightly less vibrant IPS display, but in a lower 2K resolution but still with the 120Hz refresh rate.

Both tablets are guaranteed to get two major Android OS updates up to Android 14. Lenovo will also include a subscription to Nebo, which is a note-taking, and drawing, app. MyScript is also included, which is a calculation tool.

Lenovo Legion Y32p-30 Gaming Monitor

As for the gaming monitor, Lenovo is launching the Legion Y32p- 30. This is a 31.5-inch display that has a 144Hz refresh rate, and 0.2ms response time. Of course, it’s 4K resolution, too, and has some bonus features like a sensor that can detect the brightness to adjust the screen for the best viewing depending on the time of day. RGB lights can be found under the bezel, too. The main ports include 2 x HDMI 2.1, 1 x DisplayPort 1.4, and a USB Type-C.

Note that Lenovo is including joystick navigation on this monitor. This has been a top requested feature and makes navigating the menus easier. The stand is ergonomic and can swivel, pivot, and move up and down. A cell phone holder is included at the bottom front of the stand for convenience.

The Lenovo Legion Y32p-30 Gaming Monitor is expected to start at $750. It will come in December of 2022.

New ThinkVision Monitors

Capping out Lenovo’s announcements are a series of new ThinkVision monitors. The notables on the list include the T34w-30, T32p-30, and the S25e-30.

If that confused you, don’t worry. Of the bunch, the most interesting is the ThinkVision T34w-30. This monitor is a 34-inch WQHD resolution display with a 21:9 aspect ratio and 1500R curve. This is a widescreen display for multitasking, which is why the refresh rate will cap out at 60Hz. Ports include USB Type-C, HDMI 2.0, and DisplayPort 1.4.

The ThinkVision T32p-30, meanwhile, is a new Lenovo monitor catered more toward everyday users. With slim bezels, it has a 31.5-inch panel tuned at 4K resolution.

Last up is the ThinkVision S25e-30. This is a monitor for small businesses. It sports a 24.5-inch panel at 1920 x 1080 resolution. The monitor can cover 99% sRGB color gamut and has a 75Hz refresh rate. Connectivity options include VGA, HDMI 1.4, and 3.5 mm audio out.

The ThinkVision T34w-30 Monitor starts at $849.00 and is expected to become available in January 2023. The ThinkVision S25e-30 starts at $179 and will come in January 2023. Lastly, the ThinkVision S25e-30 will start at $849 and will come out in January 2023.

The post Lenovo’s new IdeaPad 5i Chromebook has a fast 120Hz display appeared first on XDA.


from XDA https://ift.tt/Um9JvXb
via IFTTT

Apple iPhone 14 Pro may relocate privacy indicators to the hole-and-pill cutout

Rumors have been swirling since the beginning of the year about Apple replacing its iconic notch with a hole-and-pill cutout on the iPhone 14 Pro. As we get closer to the announcement of the next iPhones, we are hearing more and more news about how Apple may utilize the new design. While filling in the cutout with black seemed like a strange idea initially, we are getting new details about how Apple may use the blacked-out area.

According to 9to5Mac, Apple will use the newly created space between the hole-and-pill to relocate the green and orange indicators that are currently on the iOS status bar. If you’re unfamiliar with these indicators, they were added in iOS 14, giving users a visual representation of when the microphone or camera was in use. If the camera was in use, a green indicator dot appeared in the status bar. The same would apply to the microphone, with an orange indicator appearing in the status bar when in use.

Pill and Hole Cut out with dots and revamped camera app for iPhone 14 Pro

The problem with the current design is that both indicators cannot appear simultaneously, even if the camera and microphone are being used. If you are using an app that utilizes both, it turns orange and quickly shifts to green. The source states that with the upcoming change, iOS will be able to show both indicators at once. Additionally, Apple plans to allow users to tap on these indicators to see a list of which apps are using or have used the camera or microphone.

Furthermore, Apple may also redesign the Camera app, moving the advanced features to the top of the display. Currently, they reside in a sub-menu near the bottom near the shutter button. The change will give users more screen real estate, dedicating more of the display to the camera’s live preview. The source indicates that these new changes are being tested and that Apple plans to implement them in a future version of iOS. But, since they are in testing, there is always a possibility that they could be removed. Thankfully, we won’t have to wait long to find out, as Apple will hold its “Far Out” event on September 7.

Apple’s iPhone 14 Pro may use the hole-and-pill cutout to relocate privacy indicators.


Source: 9to5Mac

The post Apple iPhone 14 Pro may relocate privacy indicators to the hole-and-pill cutout appeared first on XDA.


from XDA https://ift.tt/l0WdVkv
via IFTTT

Going forward, Oppo will stop including chargers with some of its products

Over the past few years, many smartphone manufacturers have stopped including charging adapters with their phones. Apple is perhaps best known for being one of the first to start this trend, and soon many followed. While Oppo was a long time hold out, the company has now confirmed that it will also abandon the charger, withholding it from some of its products that will be released over the coming year.

The news was shared during the company’s European launch event of the Oppo Reno 8 Pro, the Reno 8, and the Reno 8 Lite. Billy Zhang, who is Oppo’s vice president of overseas sales and services, relayed the new strategy to press in attendance, stating, “We will take the charger out of the box in the next year for several products. We have a plan.” Oppo is in a precarious position considering that it has been working on and building up its proprietary charging technology, VOOC, and Super VOOC, since 2014. The company has included the adapters with many of its phones, allowing its devices to charge faster and more efficiently than the competition.

Zhang addressed this by stating, “It’s not that easy for consumers to get access to [SuperVOOC chargers], so we have to keep it in the box. However, as we are expanding our business operations, we are looking to taking chargers out of the box and put them in the store so that our users are able to buy the chargers and continue using them even when they upgrade their devices.” Unfortunately, Zhang didn’t dive any further into the subject, so it is unknown as of now what products will be affected. Of course, “the plan” could involve any number of moves, that will undoubtedly require numerous considerations.

As Oppo aligns itself with other companies by removing charging adapters from its products over the coming year, Zhang didn’t explain why the company was shifting its strategy. But like most of its competitors, the reason is usually linked to environmental reasons. Apple first announced it was removing chargers from its boxes with the launch of the iPhone 12. At the time, the company cited that:

Power adapters use the largest amounts of certain materials. Using smaller, lighter packaging lets us fit up to 70% more iPhone boxes per shipping pallet, which helps further reduce our carbon footprint. Eliminating power adapters from device packaging lets us avoid more than 2 million metric tons of carbon emissions, equivalent to removing 500,000 cars from the road for a year. Leaving out those adapters was a bold change for Apple and a necessary one for our planet.

Going forward, Oppo will also have to make bold decisions, deciding on what devices will and will not include charging adapters. While it is a big move for the company, one can only wait and see how its customer will react.


Source: Android Police

The post Going forward, Oppo will stop including chargers with some of its products appeared first on XDA.


from XDA https://ift.tt/hmTSJvr
via IFTTT

Going forward, Oppo will stop including chargers with some of its products

Over the past few years, many smartphone manufacturers have stopped including charging adapters with their phones. Apple is perhaps best known for being one of the first to start this trend, and soon many followed. While Oppo was a long time hold out, the company has now confirmed that it will also abandon the charger, withholding it from some of its products that will be released over the coming year.

The news was shared during the company’s European launch event of the Oppo Reno 8 Pro, the Reno 8, and the Reno 8 Lite. Billy Zhang, who is Oppo’s vice president of overseas sales and services, relayed the new strategy to press in attendance, stating, “We will take the charger out of the box in the next year for several products. We have a plan.” Oppo is in a precarious position considering that it has been working on and building up its proprietary charging technology, VOOC, and Super VOOC, since 2014. The company has included the adapters with many of its phones, allowing its devices to charge faster and more efficiently than the competition.

Zhang addressed this by stating, “It’s not that easy for consumers to get access to [SuperVOOC chargers], so we have to keep it in the box. However, as we are expanding our business operations, we are looking to taking chargers out of the box and put them in the store so that our users are able to buy the chargers and continue using them even when they upgrade their devices.” Unfortunately, Zhang didn’t dive any further into the subject, so it is unknown as of now what products will be affected. Of course, “the plan” could involve any number of moves, that will undoubtedly require numerous considerations.

As Oppo aligns itself with other companies by removing charging adapters from its products over the coming year, Zhang didn’t explain why the company was shifting its strategy. But like most of its competitors, the reason is usually linked to environmental reasons. Apple first announced it was removing chargers from its boxes with the launch of the iPhone 12. At the time, the company cited that:

Power adapters use the largest amounts of certain materials. Using smaller, lighter packaging lets us fit up to 70% more iPhone boxes per shipping pallet, which helps further reduce our carbon footprint. Eliminating power adapters from device packaging lets us avoid more than 2 million metric tons of carbon emissions, equivalent to removing 500,000 cars from the road for a year. Leaving out those adapters was a bold change for Apple and a necessary one for our planet.

Going forward, Oppo will also have to make bold decisions, deciding on what devices will and will not include charging adapters. While it is a big move for the company, one can only wait and see how its customer will react.


Source: Android Police

The post Going forward, Oppo will stop including chargers with some of its products appeared first on XDA.


from XDA https://ift.tt/kpsJGQt
via IFTTT

How to customize notification settings on Windows 11

Notifications can be a hugely important feature on our laptops, just like they are on our smartphones. They let us know when something needs our attention, and if you get distracted easily, that can help you stay on track. However, as we install more and more apps, notifications are constantly competing for our attention, and sometimes you just want to focus. Thankfully, you can customize notification settings in a variety of ways on Windows 11, and we’re here to help.

In this guide, we’re going to take a closer look at the options you have to customize notifications on Windows 11. These can help you make notifications less intrusive and allow you to focus on what’s truly important to you. With that established, let’s get right into it.

Navigate this article:

Customize general notification settings

Let’s start with the basics of notification settings. First off, if you want to get to notification settings on Windows 11, there are two ways to do it. The quickest way is to right-click the date and time section in the corner of your taskbar, then choose Notification settings.

Screenshot of the context menu that appears when you right-click the date and time section of the taskbar in Windows 11. The notification settings option is highlighted by a red outline.

Alternatively, you can use the Start menu to open the Settings app, then choose Notifications in the System section (which opens by default).

Here, you’re presented with an overview of your notification settings. You can disable notifications altogether, or click the first option, Notifications, to expand a drop-down menu. This menu has some additional options, such as turning off notification sounds. You can also choose whether you want notifications to show up on the lock screen, including a specific setting for reminders and incoming calls. Below that, there’s Focus assist, the Windows equivalent of Do not disturb. We’ll look at that in a bit.

The top of the Notifications page in the Windows 11 Settings app

You can also enable or disable notifications for each app. The apps shown here are only the ones that have sent you at least one notification, so the list may not show apps you just installed. You can click each app to go into more specific settings for that app, but we’ll explore that later.

At the bottom of the page, you can also find settings for certain notifications from the Windows system itself. For example, you can turn off suggestions on how to use certain features, or whether you want to see the Windows welcome experience after installing a new feature update. This welcome experience can teach you about new features in the update, so it can be useful, but it’s not for everyone.

Screenshott of the bottom of the Notifications page in the Windows 11 Settings app. Notification settings for Windows features are highlighted with a red outline.

Focus assist

Focus assist is the Windows 11 equivalent of Do not disturb, and it can block almost all incoming notifications as long as it’s enabled. When you clock the Focus assist option in the page shown above, you can customize various settings related to that feature. For starters, you can choose to leave it off, or use the Priority or Alarm settings. Priority mode lets you choose certain notifications that can break through Focus assist, while Alarm mode only lets alarms through.

There’s also an option here to let you see notifications you missed while Focus assist was on. With this enabled, when you disable Focus assist, you’ll see a notification with a summary of everything you missed.

Screenshot of the Windows 11 Focus assist settings page

Below these options, you a section for automatic rules, which are certain situations where Focus assist will kick in automatically. There are options to enable it during a specific time of the day, along with more special rules, such as when you’re duplicating your display or while running a full-screen app. These can be useful so you don’t get awkward notifications while you’re presenting your screen, or if you don’t want to get interrupted while playing a game. Oddly enough, there’s also a rule to disable notifications for the first hour after installing a feature update, and it’s enabled by default.

If you click any of these rules, you can choose whether you want Focus assist to turn on in Priority mode or Alarm mode, and you can also choose whether you want to be notified when Focus assist is enabled automatically.

Screenshot of the Windows 11 Settings app displaying the configuration page for the automatic rule that enables focus assist when duplicating the display.

Customizing your priority list

As mentioned above, one of the options Focus assist offers is called Priority, and this allows select apps to still send notifications if you consider them important. If you click Customize priority list, you can choose to allow VoIP calls to come through, as well as reminders. Then, of course, you can choose specific apps you want to add to your priority list, so notifications from those apps are always shown. A few apps are added by default, but you can remove them or add some others.

Screenshot of the Focus assist priority list settings in the Windows 11 Setttings app

There’s also a section on this page to allow notifications from certain people to break through. This is based on the People app, however, which is basically unusable nowadays, and it only includes Outlook contacts. It doesn’t even work with Microsoft Teams contacts, despite the app being built into Windows 11.

Customize per-app notification settings in Windows 11

Finally, let’s talk about notification settings for individual apps. As we mentioned above, the notifications settings page (Settings -> System -> Notifications) lets you turn notifications on or off for each app. However, you can also click an app’s name to see more detailed notification settings for that app.

For example. let’s go with Microsoft Teams, since it’s built into Windows 11. When you open the notification settings for that app, you see a few options. First off, you can choose whether you want notification banners to show up – those are the little pop-ups that show up on the bottom right corner of your screen. You can also choose whether you want those notifications to be visible in the notification center, which you can open by clicking the date and time on your taskbar (or by pressing the Windows key and N on your keyboard).

Notification settings for the Microsoft Teams app on Windows 11

Other options let you hide notification contents on the lock screen, so people can’t see your notifications without entering your password or PIN. You can also turn off notification sounds and choose the priority level of notifications from that app. A higher priority means notifications will be shown at the top of the notification center, and if you receive multiple high-priority notifications, you can also see up to three of them pop up on screen at once, as opposed to just one for normal notifications.

Notification settings in Windows 11 version 22H2

So far, we’ve talked about the notification settings in the original release of Windows 11, but you may already be running Windows 11 version 22H2. This is the first feature update to Windows 11, and it comes with a few important changes to notification settings. In this version, if you go to the notification settings page (Settings  -> System -> Notifications), things look a bit different, but most of the functionality is the same.

For starters, Focus assist has been renamed to Do not disturb, so it aligns with what you probably already know from other platforms. It’s been simplified, too, so it’s either on or off, and you can no longer choose between Priority or Alarms mode. Plus, all the Do not disturb settings are now directly available in the notifications page, without taking you to a separate page entirely.

Sreenshot of notification settings in Windows 11 version 22H2

It’s also worth noting that the page where you customize the priority list has been updated with a new design, and it removes the useless People section we mentioned above.

Priority list settings in Windows 11 version 22H2

Focus

Something new you will notice in the new Notifications page is the Focus option. This is where you can choose options related to focus sessions, a feature that was introduced with Windows 11 as part of the Clock app. In this page, you can start a focus session, choose how long it will last, and hide taskbar notification badges and flashing (when an app on the taskbar turns orange to get your attention).

Focus settings in Windows 11 version 22H2

When you start a focus session, it will enable the settings you choose on this page. You can learn more about the Clock app with focus sessions in our deep dive if you’re interested in that.


And that’s all you need to know about how to customize notification settings on your Windows 11 PC. If you’re keen on learning more about Windows 11, we have a few other guides for you. We have an general guide on how to use Windows 11 as a whole, which is a great starting point for new users.

The post How to customize notification settings on Windows 11 appeared first on XDA.


from XDA https://ift.tt/vVj20Oq
via IFTTT

How to customize notification settings on Windows 11

Notifications can be a hugely important feature on our laptops, just like they are on our smartphones. They let us know when something needs our attention, and if you get distracted easily, that can help you stay on track. However, as we install more and more apps, notifications are constantly competing for our attention, and sometimes you just want to focus. Thankfully, you can customize notification settings in a variety of ways on Windows 11, and we’re here to help.

In this guide, we’re going to take a closer look at the options you have to customize notifications on Windows 11. These can help you make notifications less intrusive and allow you to focus on what’s truly important to you. With that established, let’s get right into it.

Navigate this article:

Customize general notification settings

Let’s start with the basics of notification settings. First off, if you want to get to notification settings on Windows 11, there are two ways to do it. The quickest way is to right-click the date and time section in the corner of your taskbar, then choose Notification settings.

Screenshot of the context menu that appears when you right-click the date and time section of the taskbar in Windows 11. The notification settings option is highlighted by a red outline.

Alternatively, you can use the Start menu to open the Settings app, then choose Notifications in the System section (which opens by default).

Here, you’re presented with an overview of your notification settings. You can disable notifications altogether, or click the first option, Notifications, to expand a drop-down menu. This menu has some additional options, such as turning off notification sounds. You can also choose whether you want notifications to show up on the lock screen, including a specific setting for reminders and incoming calls. Below that, there’s Focus assist, the Windows equivalent of Do not disturb. We’ll look at that in a bit.

The top of the Notifications page in the Windows 11 Settings app

You can also enable or disable notifications for each app. The apps shown here are only the ones that have sent you at least one notification, so the list may not show apps you just installed. You can click each app to go into more specific settings for that app, but we’ll explore that later.

At the bottom of the page, you can also find settings for certain notifications from the Windows system itself. For example, you can turn off suggestions on how to use certain features, or whether you want to see the Windows welcome experience after installing a new feature update. This welcome experience can teach you about new features in the update, so it can be useful, but it’s not for everyone.

Screenshott of the bottom of the Notifications page in the Windows 11 Settings app. Notification settings for Windows features are highlighted with a red outline.

Focus assist

Focus assist is the Windows 11 equivalent of Do not disturb, and it can block almost all incoming notifications as long as it’s enabled. When you clock the Focus assist option in the page shown above, you can customize various settings related to that feature. For starters, you can choose to leave it off, or use the Priority or Alarm settings. Priority mode lets you choose certain notifications that can break through Focus assist, while Alarm mode only lets alarms through.

There’s also an option here to let you see notifications you missed while Focus assist was on. With this enabled, when you disable Focus assist, you’ll see a notification with a summary of everything you missed.

Screenshot of the Windows 11 Focus assist settings page

Below these options, you a section for automatic rules, which are certain situations where Focus assist will kick in automatically. There are options to enable it during a specific time of the day, along with more special rules, such as when you’re duplicating your display or while running a full-screen app. These can be useful so you don’t get awkward notifications while you’re presenting your screen, or if you don’t want to get interrupted while playing a game. Oddly enough, there’s also a rule to disable notifications for the first hour after installing a feature update, and it’s enabled by default.

If you click any of these rules, you can choose whether you want Focus assist to turn on in Priority mode or Alarm mode, and you can also choose whether you want to be notified when Focus assist is enabled automatically.

Screenshot of the Windows 11 Settings app displaying the configuration page for the automatic rule that enables focus assist when duplicating the display.

Customizing your priority list

As mentioned above, one of the options Focus assist offers is called Priority, and this allows select apps to still send notifications if you consider them important. If you click Customize priority list, you can choose to allow VoIP calls to come through, as well as reminders. Then, of course, you can choose specific apps you want to add to your priority list, so notifications from those apps are always shown. A few apps are added by default, but you can remove them or add some others.

Screenshot of the Focus assist priority list settings in the Windows 11 Setttings app

There’s also a section on this page to allow notifications from certain people to break through. This is based on the People app, however, which is basically unusable nowadays, and it only includes Outlook contacts. It doesn’t even work with Microsoft Teams contacts, despite the app being built into Windows 11.

Customize per-app notification settings in Windows 11

Finally, let’s talk about notification settings for individual apps. As we mentioned above, the notifications settings page (Settings -> System -> Notifications) lets you turn notifications on or off for each app. However, you can also click an app’s name to see more detailed notification settings for that app.

For example. let’s go with Microsoft Teams, since it’s built into Windows 11. When you open the notification settings for that app, you see a few options. First off, you can choose whether you want notification banners to show up – those are the little pop-ups that show up on the bottom right corner of your screen. You can also choose whether you want those notifications to be visible in the notification center, which you can open by clicking the date and time on your taskbar (or by pressing the Windows key and N on your keyboard).

Notification settings for the Microsoft Teams app on Windows 11

Other options let you hide notification contents on the lock screen, so people can’t see your notifications without entering your password or PIN. You can also turn off notification sounds and choose the priority level of notifications from that app. A higher priority means notifications will be shown at the top of the notification center, and if you receive multiple high-priority notifications, you can also see up to three of them pop up on screen at once, as opposed to just one for normal notifications.

Notification settings in Windows 11 version 22H2

So far, we’ve talked about the notification settings in the original release of Windows 11, but you may already be running Windows 11 version 22H2. This is the first feature update to Windows 11, and it comes with a few important changes to notification settings. In this version, if you go to the notification settings page (Settings  -> System -> Notifications), things look a bit different, but most of the functionality is the same.

For starters, Focus assist has been renamed to Do not disturb, so it aligns with what you probably already know from other platforms. It’s been simplified, too, so it’s either on or off, and you can no longer choose between Priority or Alarms mode. Plus, all the Do not disturb settings are now directly available in the notifications page, without taking you to a separate page entirely.

Sreenshot of notification settings in Windows 11 version 22H2

It’s also worth noting that the page where you customize the priority list has been updated with a new design, and it removes the useless People section we mentioned above.

Priority list settings in Windows 11 version 22H2

Focus

Something new you will notice in the new Notifications page is the Focus option. This is where you can choose options related to focus sessions, a feature that was introduced with Windows 11 as part of the Clock app. In this page, you can start a focus session, choose how long it will last, and hide taskbar notification badges and flashing (when an app on the taskbar turns orange to get your attention).

Focus settings in Windows 11 version 22H2

When you start a focus session, it will enable the settings you choose on this page. You can learn more about the Clock app with focus sessions in our deep dive if you’re interested in that.


And that’s all you need to know about how to customize notification settings on your Windows 11 PC. If you’re keen on learning more about Windows 11, we have a few other guides for you. We have an general guide on how to use Windows 11 as a whole, which is a great starting point for new users.

The post How to customize notification settings on Windows 11 appeared first on XDA.


from XDA https://ift.tt/diGecnk
via IFTTT

Arm is suing Qualcomm over the Nuvia acquisition

Arm is suing one of its biggest partners, the company announced today. The action is against Qualcomm, and it’s related to the firm’s acquisition of Nuvia, saying that Qualcomm sought to transfer Nuvia’s licenses without its consent.

According to Arm, Nuvia’s licenses expired back in March, and Arm attempted to resolve the issue. That means that Qualcomm has allegedly broken its agreement. At the time of this writing, Qualcomm has not responded to our requests for comment.

What Arm is seeking here is for Qualcomm to effectively throw out any chip designs that have been made by Nuvia since the company was acquired. It’s a big ask, since Qualcomm acquired the firm for $1.4 billion.

“Arm takes pride in our role as innovator of the world’s most critical semiconductor IP and the billions of devices that run on Arm,” said Arm in a statement. “These technological achievements have required years of research and significant costs and should be recognized and respected. As an intellectual property company, it is incumbent upon us to protect our rights and the rights of our ecosystem. We will work vigorously to protect what is rightfully ours and we are confident that the courts will agree with us.”

Nuvia is a key part of Qualcomm’s plans

The reason Qualcomm spent so much money is because Nuvia is a major, major part of its plans moving forward. With all of its current products, Qualcomm doesn’t design its own chips. It licenses the design from Arm, and those designs are usually announced earlier in the year.

Nuvia would allow Qualcomm to make proper custom Arm chips, only using the instruction set instead of the full design. This is how Apple already operates with its entire suite of products, which are currently shining a light on the market for how good custom Arm processors can be, and what’s lacking from the competition.

The Nuvia acquisition doesn’t just let Qualcomm compete with Apple though. It also helps in competing with Intel and AMD. All of these other major chip-vendors design their processors from the ground up. They’re not relying on a design from someone else. Owning that full stack puts Qualcomm on a level playing field.

Nuvia chips aren’t set to arrive until next year

When Qualcomm bought Nuvia, it said that the first custom chips – which are for laptops and aimed to compete with Apple’s M1 – would begin sampling with OEMs in the second half of 2022. OEMs do require 12-18 months with a chip before a laptop comes to market, so while the chip is well into development, it wouldn’t arrive until at least the second half of 2023. But because of the stage of development, the idea that Qualcomm might have to just throw it in the trash is a big deal.

Other companies, like MediaTek, are still licensing Arm’s designs, and MediaTek is one of several companies looking to enter the Windows laptop space once an exclusivity deal between Microsoft and Qualcomm expires. If it does turn out that Qualcomm can’t use its Nuvia design, it would surely be a win for MediaTek.

Qualcomm is holding its Snapdragon Technology Summit in Maui this year, and this time it will be a little earlier, in November. We’re not likely to see a proper chip announcement based on Nuvia’s technology, no matter how this case turns out. It’s still too early.

Source: Arm

The post Arm is suing Qualcomm over the Nuvia acquisition appeared first on XDA.


from XDA https://ift.tt/zxJWMHR
via IFTTT

How to factory reset an Apple HomePod or HomePod Mini

Almost all of the time, Apple’s HomePod and HomePod Mini are simple to use and just get on with their job without fuss. But occasionally things go wrong. In those instances, you have options, like rebooting the HomePod. But in others, you’ll need to pull out the big guns and go for a full factory reset. You also need to do this before disposing off or selling your HomePod speaker.

Setting up the HomePod is such an incredibly simple process you’re probably hoping the same is true of resetting. That isn’t totally untrue, but as the settings and controls are designed to get out of the way, it’s not immediately obvious how to do it.

Never fear. Let’s dive in and explain it all.

What to try first if your HomePod is misbehaving

Apple HomePod settings

Resetting your HomePod should be the last resort if it’s misbehaving. There was a time also you would need to do this just to change to a new Wi-Fi network, but thankfully that isn’t the case anymore. But before resetting you should try simply restarting your HomePod to see if it fixes the problem.

You can do this in the Home app either on a Mac or on an iOS device.

  1. Open the Home app.
  2. On iOS, touch and hold on your HomePod. On Mac, right-click on it.
  3. On iOS, scroll to the bottom and tap the settings cog. On Mac, select Settings from the right-click menu.
  4. Select Reset HomePod.
  5. Select Restart HomePod.

Your HomePod will now reboot itself and when it comes back to life hopefully rectified your issues. If it didn’t or you’re getting rid of your HomePod, then you’ll be looking at a full factory reset.

How to perform a factory reset on a HomePod

HomePod Mini

The process of doing a factory reset in the Home app is a little misleading. It involves following the steps from the previous section up to step four. But when you tap Reset HomePod you don’t actually have an option in the next menu that just says reset.

Instead, you have to remove the HomePod from your Home entirely. This triggers the factory reset. So, instead of choosing the restart option as above, select Remove Accessory instead. You can now set it up again as a new device and hopefully, your issues have been resolved.

Alternative methods to reset a HomePod

Restoring a HomePod with a Mac

There are a couple of alternative methods to reset a HomePod that don’t involve the Home app. You shouldn’t need to use these, but if the app method isn’t working it’s handy to have something to fall back on.

The first thing you can do is hook up your HomePod to your Mac or PC directly using its integrated cable. On the Mac, you’ll see the device show up inside Finder, but on Windows, you’ll need to have the latest version of iTunes installed.

iTunes (Free+, Microsoft Store) →

Whichever you’re using when your HomePod appears, click on it, then click the box that says Restore HomePod. Your Mac or PC will now go through the restore process to put your HomePod back to factory settings. Once the light on the top is no longer orange, the process is complete.

Alternatively, you can try the hardware method.

  1. Unplug your HomePod and wait for about 10 seconds.
  2. Plug it back in and wait for the same time.
  3. Touch and hold on top of the HomePod.
  4. Wait for the light to turn red and keep holding.
  5. When you hear a message from Siri about resetting followed by three beeps, release your finger.

As before this will restore the HomePod to factory settings and you can now set it up again using your Mac or iOS device.

    Apple HomePod Mini
    Apple's HomePod Mini is small in size but big in sound and is a great partner to the Mac, iPhone and iPad.

The post How to factory reset an Apple HomePod or HomePod Mini appeared first on XDA.


from XDA https://ift.tt/cy5t8DI
via IFTTT

How to factory reset an Apple HomePod or HomePod Mini

Almost all of the time, Apple’s HomePod and HomePod Mini are simple to use and just get on with their job without fuss. But occasionally things go wrong. In those instances, you have options, like rebooting the HomePod. But in others, you’ll need to pull out the big guns and go for a full factory reset. You also need to do this before disposing off or selling your HomePod speaker.

Setting up the HomePod is such an incredibly simple process you’re probably hoping the same is true of resetting. That isn’t totally untrue, but as the settings and controls are designed to get out of the way, it’s not immediately obvious how to do it.

Never fear. Let’s dive in and explain it all.

What to try first if your HomePod is misbehaving

Apple HomePod settings

Resetting your HomePod should be the last resort if it’s misbehaving. There was a time also you would need to do this just to change to a new Wi-Fi network, but thankfully that isn’t the case anymore. But before resetting you should try simply restarting your HomePod to see if it fixes the problem.

You can do this in the Home app either on a Mac or on an iOS device.

  1. Open the Home app.
  2. On iOS, touch and hold on your HomePod. On Mac, right-click on it.
  3. On iOS, scroll to the bottom and tap the settings cog. On Mac, select Settings from the right-click menu.
  4. Select Reset HomePod.
  5. Select Restart HomePod.

Your HomePod will now reboot itself and when it comes back to life hopefully rectified your issues. If it didn’t or you’re getting rid of your HomePod, then you’ll be looking at a full factory reset.

How to perform a factory reset on a HomePod

HomePod Mini

The process of doing a factory reset in the Home app is a little misleading. It involves following the steps from the previous section up to step four. But when you tap Reset HomePod you don’t actually have an option in the next menu that just says reset.

Instead, you have to remove the HomePod from your Home entirely. This triggers the factory reset. So, instead of choosing the restart option as above, select Remove Accessory instead. You can now set it up again as a new device and hopefully, your issues have been resolved.

Alternative methods to reset a HomePod

Restoring a HomePod with a Mac

There are a couple of alternative methods to reset a HomePod that don’t involve the Home app. You shouldn’t need to use these, but if the app method isn’t working it’s handy to have something to fall back on.

The first thing you can do is hook up your HomePod to your Mac or PC directly using its integrated cable. On the Mac, you’ll see the device show up inside Finder, but on Windows, you’ll need to have the latest version of iTunes installed.

iTunes (Free+, Microsoft Store) →

Whichever you’re using when your HomePod appears, click on it, then click the box that says Restore HomePod. Your Mac or PC will now go through the restore process to put your HomePod back to factory settings. Once the light on the top is no longer orange, the process is complete.

Alternatively, you can try the hardware method.

  1. Unplug your HomePod and wait for about 10 seconds.
  2. Plug it back in and wait for the same time.
  3. Touch and hold on top of the HomePod.
  4. Wait for the light to turn red and keep holding.
  5. When you hear a message from Siri about resetting followed by three beeps, release your finger.

As before this will restore the HomePod to factory settings and you can now set it up again using your Mac or iOS device.

    Apple HomePod Mini
    Apple's HomePod Mini is small in size but big in sound and is a great partner to the Mac, iPhone and iPad.

The post How to factory reset an Apple HomePod or HomePod Mini appeared first on XDA.


from XDA https://ift.tt/iYSxwBZ
via IFTTT

mardi 30 août 2022

Instagram will begin testing a potentially powerful content filtering tool

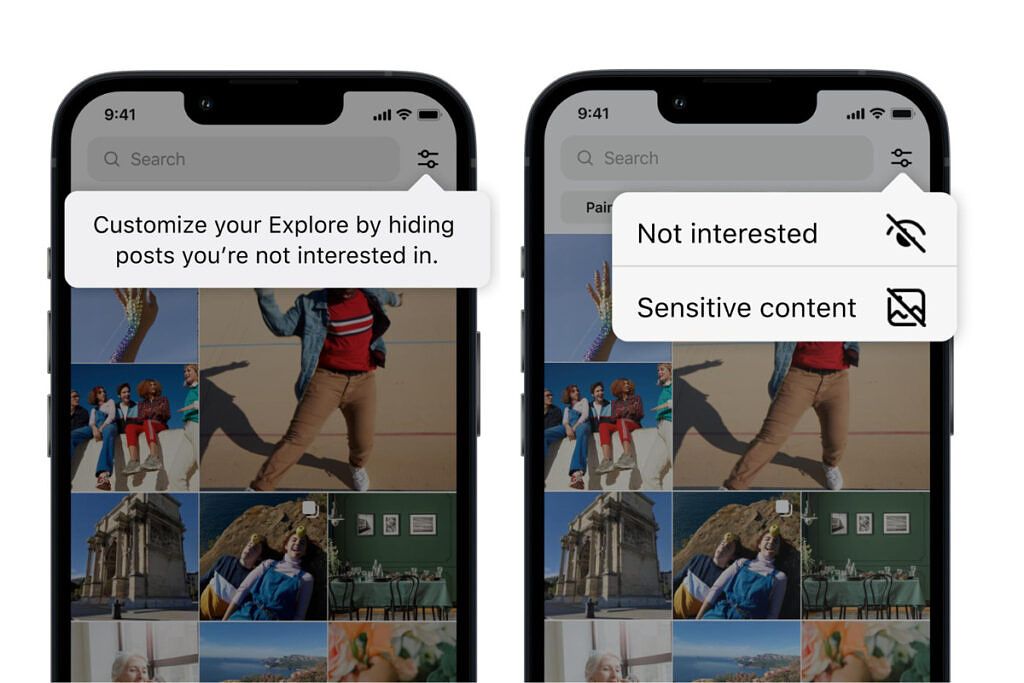
Instagram has been busy as of late, adding lots of new features to its platform. While the company currently does have a way to customize what ends up on the Explore page, it doesn’t have a precise way to refine the images and videos that pop up daily. Thankfully, the firm has announced that it is testing a couple of new ways to hopefully allow users to improve the content on the Explore page in the future.

Instagram Feed options

The new test will allow users to refine their feed further and, hopefully, have recommended content delivered that is more in line with what they are looking for. Users can currently refine their feed by selecting content and marking it as “Not Interested.” While this is a great solution, sometimes it can be slow if several items need to be marked at once. The new test allows users to mark multiple items at once, making it faster and more efficient to filter out content they don’t want to see. Furthermore, Instagram will take things a step further, allowing users to filter out suggested content using words, phrases, or even emoji found in the caption and hashtags. Currently, the more granular filtering option is not live in the test. Instagram did not offer a timeline for when it would become available.

Instagram Feed options

Recently, Instagram has put a lot of focus into creating a safe place for teens. Last week, it updated the Sensitive Content Control, showing less sensitive content by default to teens 16 years and under. The firm has also introduced age verification in the United States, requiring users to provide a valid form of identification when signing up for Instagram. But, being able to filter content will take things to another level. If this kind of filtering goes live, it could become an extremely powerful tool for the platform and its users.


Source: Facebook

The post Instagram will begin testing a potentially powerful content filtering tool appeared first on XDA.


from XDA https://ift.tt/cz0KnEC
via IFTTT

Instagram will begin testing a potentially powerful content filtering tool

Instagram has been busy as of late, adding lots of new features to its platform. While the company currently does have a way to customize what ends up on the Explore page, it doesn’t have a precise way to refine the images and videos that pop up daily. Thankfully, the firm has announced that it is testing a couple of new ways to hopefully allow users to improve the content on the Explore page in the future.

Instagram Feed options

The new test will allow users to refine their feed further and, hopefully, have recommended content delivered that is more in line with what they are looking for. Users can currently refine their feed by selecting content and marking it as “Not Interested.” While this is a great solution, sometimes it can be slow if several items need to be marked at once. The new test allows users to mark multiple items at once, making it faster and more efficient to filter out content they don’t want to see. Furthermore, Instagram will take things a step further, allowing users to filter out suggested content using words, phrases, or even emoji found in the caption and hashtags. Currently, the more granular filtering option is not live in the test. Instagram did not offer a timeline for when it would become available.

Instagram Feed options

Recently, Instagram has put a lot of focus into creating a safe place for teens. Last week, it updated the Sensitive Content Control, showing less sensitive content by default to teens 16 years and under. The firm has also introduced age verification in the United States, requiring users to provide a valid form of identification when signing up for Instagram. But, being able to filter content will take things to another level. If this kind of filtering goes live, it could become an extremely powerful tool for the platform and its users.


Source: Facebook

The post Instagram will begin testing a potentially powerful content filtering tool appeared first on XDA.


from XDA https://ift.tt/ZtHJmAq
via IFTTT

Apple iPhone 14 Pro rumors indicate a better camera, stronger MagSafe, and more

We are a little over a week away from the release of the next iPhone, and more rumors and leaks are starting to roll in. As we count down the days to the “Far Out” event, let’s take a look at some of the more recent rumors that have popped up regarding the Apple iPhone 14 Pro.

While many things will change with the introduction of the iPhone 14 and iPhone 14 Pro, one of the most important changes rumored so far has been the look of the iPhone 14 Pro. The Pro devices this year will get a facelift, with the display notch being whittled down to a new pill and hole cutout. But, it appears the Pro model will get another improvement in the form of its camera. According to analyst Ming-Chi Kuo, the ultra-wide camera on the iPhone 14 Pro will be getting an upgrade to a larger sensor going from the current 1.0µm to 1.4µm. This should allow the upcoming phones to take better images in lower-light scenarios, relying less on computational photography.

Although the new parts will be good for the phones, Kuo does state that the parts are going to be considerably more expensive, with an increase of up to 70 percent. Kuo did not state whether this cost would be passed on to consumers. There have been rumors over the past few months that indicate that the Pro models could see a price increase. When it comes to colors, as expected, for the new Pro models, last year’s Sierra Blue will be retired, and a new color, purple, will be brought in to replace it. Apple will most likely have a better moniker for the color when it debuts at the Apple event. There is also the possibility that a variation of the Alpine Green color will stick around.

In addition to the color change, Naver reports that MagSafe for iPhone could be gaining a small improvement, with Apple using stronger magnets to create improved connections with accessories. This should greatly improve the experience with heavier accessories like the MagSafe Battery Pack and Wallet with MagSafe. The source also discusses a new battery accessory, although specifics of this device were not mentioned. Furthermore, those hoping to get their hands on a titanium model of the iPhone might be disappointed, as it might not come to fruition in this release. Apparently, a prototype was made, but due to cost and the difficulty in manufacturing, it has reportedly been canceled. Last but certainly not least, coming from the same source, the new iPhone Pro models will start at 128GB of storage and will once again top out at 1TB.

While there is certainly a lot of information coming out about the iPhone ahead of its release, it’s important to note that none of these have been confirmed by Apple. Although some of the sources have had good track records, things can always change. With that said, we have a little over a week to go before we hear official news from Apple, so what are some of the things you are looking forward to from the September event?


Source: Ming-Chi Kuo (Twitter), Naver, DuanRui (Twitter)
Via: 9to5Mac

The post Apple iPhone 14 Pro rumors indicate a better camera, stronger MagSafe, and more appeared first on XDA.


from XDA https://ift.tt/NojRlQb
via IFTTT

Apple iPhone 14 Pro rumors indicate a better camera, stronger MagSafe, and more

We are a little over a week away from the release of the next iPhone, and more rumors and leaks are starting to roll in. As we count down the days to the “Far Out” event, let’s take a look at some of the more recent rumors that have popped up regarding the Apple iPhone 14 Pro.

While many things will change with the introduction of the iPhone 14 and iPhone 14 Pro, one of the most important changes rumored so far has been the look of the iPhone 14 Pro. The Pro devices this year will get a facelift, with the display notch being whittled down to a new pill and hole cutout. But, it appears the Pro model will get another improvement in the form of its camera. According to analyst Ming-Chi Kuo, the ultra-wide camera on the iPhone 14 Pro will be getting an upgrade to a larger sensor going from the current 1.0µm to 1.4µm. This should allow the upcoming phones to take better images in lower-light scenarios, relying less on computational photography.

Although the new parts will be good for the phones, Kuo does state that the parts are going to be considerably more expensive, with an increase of up to 70 percent. Kuo did not state whether this cost would be passed on to consumers. There have been rumors over the past few months that indicate that the Pro models could see a price increase. When it comes to colors, as expected, for the new Pro models, last year’s Sierra Blue will be retired, and a new color, purple, will be brought in to replace it. Apple will most likely have a better moniker for the color when it debuts at the Apple event. There is also the possibility that a variation of the Alpine Green color will stick around.

In addition to the color change, Naver reports that MagSafe for iPhone could be gaining a small improvement, with Apple using stronger magnets to create improved connections with accessories. This should greatly improve the experience with heavier accessories like the MagSafe Battery Pack and Wallet with MagSafe. The source also discusses a new battery accessory, although specifics of this device were not mentioned. Furthermore, those hoping to get their hands on a titanium model of the iPhone might be disappointed, as it might not come to fruition in this release. Apparently, a prototype was made, but due to cost and the difficulty in manufacturing, it has reportedly been canceled. Last but certainly not least, coming from the same source, the new iPhone Pro models will start at 128GB of storage and will once again top out at 1TB.

While there is certainly a lot of information coming out about the iPhone ahead of its release, it’s important to note that none of these have been confirmed by Apple. Although some of the sources have had good track records, things can always change. With that said, we have a little over a week to go before we hear official news from Apple, so what are some of the things you are looking forward to from the September event?


Source: Ming-Chi Kuo (Twitter), Naver, DuanRui (Twitter)
Via: 9to5Mac

The post Apple iPhone 14 Pro rumors indicate a better camera, stronger MagSafe, and more appeared first on XDA.


from XDA https://ift.tt/Gv5D7lN
via IFTTT

lundi 29 août 2022

T-Mobile will now carry Meta’s Ray-Ban Stories

Towards the end of last year, Facebook, in partnership with Ray-Ban launched smart sunglasses called Ray-Ban Stories. While they haven’t taken off, they are still a unique and fashionable way to capture photos and videos. Now it looks like T-Mobile will begin offering the glasses online and at its retail stores, giving users a new place to purchase the device.

Although there are currently three models available from Ray-Bans, T-Mobile will carry the classic Wayfarer design in two sizes, 50mm and 53mm. The device can capture pictures and video using its dual 5MP cameras. There is a physical button that can be pushed to capture videos, and long pressed for pictures. If that’s too much of a hassle it can also accept voice commands. The unit also offers audio through its open-ear speakers that can play music and receive audio from your phone for calls. You can control the audio using the built-in touchpad found on the right temple.

If you’re wondering about audio quality for videos and voice calls, you aren’t alone. Ray-Ban Stories is equipped with three built-in microphones to capture clear audio. The device has 4GB of internal storage which can hold up to 500 images or a little over 15 60 second videos clips. In order to see what you are capturing, you will need to download a proprietary app called View. The app is compatible with iOS and Android and will allow you to check out the photos and videos you have shot.

T-Mobile seems to have a lot on its place as of late. The firm announced a partnership with SpaceX just last week that will try to end cellular dead zones in the United States. The wireless carrier also just announced that it would be offering Apple TV Plus to its Magenta Max subscribers for free. If interested in the Ray-Ban Stories, you can now purchase them directly from T-Mobile. It will offer them for retail at $299.99 but will also have the option to make a one time payment of $149.99 and pay $12.50 per month over 12 months.


Source: T-Mobile (YouTube), T-Mobile

The post T-Mobile will now carry Meta’s Ray-Ban Stories appeared first on XDA.


from XDA https://ift.tt/1GarS2h
via IFTTT

Google Docs makes it easier to add emoji to your web document

Back in April, Google introduced emoji reactions to Google Docs on the web. In order to use an emoji in Google Docs, web users had to highlight a word or phrase, then choose the emoji button from a pop-up bubble that would appear on right-hand side of the document. While it certainly brought access to emoji, it wasn’t the most convenient way of getting your point across using them. Thankfully, Google has made some changes, making it much easier to insert emoji into a document.

Now, Google Doc users will only have to type “@” followed by the name of the emoji in order to insert into a document. By typing the “@” symbol, followed by the object, Google Docs will provide a list of emoji that fit that criteria. While it doesn’t look active at this moment, Google has also shared that you can also type “:” in order to search for emoji. Those that are seasoned users of Google Docs on the web will know that typing in the “@” symbol will also being up other options as well.

Currently, using the “@” command, users can make use of the platform’s Building Blocks feature. The feature gives quick access to tools like being able to draft an email in Google Docs and sending it to Gmail. Google Docs can also pull events from your email and import them directly into a document, making it easy to create notes or event action items. There are also options for creating product roadmaps, a review tracker, and more. Naturally, all of this is occurring within Google Docs so collaboration is easy and seamless, and invitations to a project can be done with a click of a button. Users will also have access to lists, media, tables, page components, and more. Google makes the “@” command more powerful, mixing old with new.

If you haven’t tried it yet, be sure to head into Google Docs on the web to give it a try. The blog does state that it is a gradual rollout, so there is the chance that the quick access menu for emoji isn’t activated just yet. But if not, check back in a couple weeks and it should be there. The service is available to all personal, business, Workspace, and legacy G Suite users.


Source: Google Blog 

The post Google Docs makes it easier to add emoji to your web document appeared first on XDA.


from XDA https://ift.tt/mW3l0Xe
via IFTTT

AMD Ryzen 7000 launch date is official, promises to be the best gaming chip

At CES back in January, AMD announced that while Ryzen 6000 laptops were on the way, desktops were going to skip that generation and go right to Ryzen 7000. While various details have been announced along the way, the company announced all of the details today. You’ll be able to buy any of four SKUs on September 27, ranging from $299 to $699.

Starting with some of the highlights, AMD says that it outperformed its goals for Ryzen 7000. It was looking to boost IPC (instructions per clock) by 8-10%, and it actually got to 13% over Zen 3. The firm is also saying that the new Ryzen 9 7950X, which sits at the top of the lineup, offers 57% better content creation performance than an Intel Core i9-12900K.

“The AMD Ryzen 7000 Series brings leadership gaming performance, extraordinary power for content creation, and advanced scalability with the new AMD Socket AM5,” Saeid Moshkelani, senior vice president and general manager, Client business unit, AMD. “With the next generation Ryzen 7000 Series Desktop processors, we are proud to uphold our promise of leadership and continuous innovation, delivering the ultimate PC experience for gamers and creators alike.”

As you’d expect, AMD brought out the benchmarks

That’s not all though. AMD compared its processor gen-over-gen, saying that the Ryzen 9 7950X has a 32% boost in DOTA 2, a 35% boost in Shadow of the Tome Raider performance, a 6% increase in Borderlands 3 performance, and a 13% increase in CS:GO performance over the Ryzen 9 5950X.

AMD Ryzen 7000 family

AMD didn’t just compare its new processors to Intel in content creation. It says that its Zen 4 cores are the best for gaming, a somewhat common claim for new desktop processors that Intel is sure to make when it launches 13th-gen next month. It pointed to Geekbench 5.4 single-thread scores. Where a Core i9-12900K came in at 2,040, a Ryzen 5 7600X came in at 2,175, and the Ryzen 9 7950X came in at 2275.

The company went so far as to say that the Ryzen 5 7600X, on average, offers 5% better gaming performance than a Core i9-12900K.

But what about everything else?

Obviously, speeds and feeds just tell you about, well, speeds and feeds. The Ryzen 9 7950X offers 16 cores with 32 threads, a boost clock of up to 5.7GHz, a total cache of 80MB (the L2 cache has been doubled), and a 170W TDP. Yes, that’s a significant boost in TDP, but AMD is promising a big boost in efficiency.

AMD Ryzen 7000 processor

With the new TSMC 5nm process as part of Zen 4, AMD has shrunken down the Core + L2 area to 3.84 square millimeters, while Intel’s is 7.46 square millimeters on the Intel 7 process (Alder Lake). With that, AMD is promising 1.47 times the performance per watt of Intel, a company promising to have the industry lead in performance per watt by 2025.

Model Cores/Threads Boost / Base Frequency Total Cache PCIe TDP
AMD Ryzen 9 7950X 16C / 32T Up to 5.7 / 4.5GHz 80MB Gen 5 170W
AMD Ryzen 9 7900X 12C / 24T Up to 5.6 / 4.7GHz 76MB Gen 5 170W
AMD Ryzen 7 7700X 8C / 16T Up to 5.4 / 4.5GHz 40MB Gen 5 105W
AMD Ryzen 5 7600X 6C / 12T Up to 5.3 / 4.7GHz 38MB Gen 5 195W

Other important improvements are support for DDR5 memory and PCIe 5.0, both of which are already supported by Intel’s latest generation of chips. One key difference, however, is that Ryzen 7000 only supports DDR5 memory. The company says that after so much time, DDR4 is at the end of its life.

It’s fair to say that the death of DDR4 has been dragged out a bit, thanks to component shortages that kept DDR5 prices high, and the fact that in this early stage of DDR5 evolution, there wasn’t that much of an advantage. The advantage simply wasn’t enough to cover the difference in price.

AMD sees that as changing, so it’s going with DDR5. It’s also announcing Expo memory, which is optimized for AM5 boards and can be overclocked. These are going to arrive from companies like ADATA, Corsair, Kingston, and more in November. There will be more than 15 kits available at launch, coming in at speeds of up to DDR5-6400.

The new AM5 platform, guaranteed to be used through at least 2025

Unlike Intel, which seems to rarely allow a CPU socket to last more than two generations at this point, AMD has boasted future-proofing as one of its value propositions. The AM4 socket has been around for over five years and lasted through five CPU architectures. It actually predates the Zen architecture and the Ryzen brand.

AM5 motherboard with AMD Ryzen processor

It’s time for AM5, which includes a 1718 pin LGA socket, including up to 230W socket power delivery. Most importantly though, it’s meant to be future-proofed, including DDR5 and PCIe 5.0.

PCIe 5.0 offers double the bandwidth of its predecessor. That means faster SSDs, which is great when we’re talking about things like DirectStorage. But along with other things, it can get you faster graphics. AMD has four platforms out of the gate: X670, X670 Extreme, B650, and B650 Extreme. They all offer PCIe 5.0 storage, but the Extreme options also offer PCIe 5.0 graphics.

The AM5 platform does support AM4 coolers, so while you’ll have to swap out your board, you should be able to keep your cooler.

As for how long AMD is planning to use AM5, it should be for at least three more years. The firm is promising to use the new platform until at least 2025.

AMD Ryzen 7000 pricing and availability

You’ll be able to pick up an AMD Ryzen 7000 processor beginning on September 27. There are four SKUs, with the following pricing:

Ryzen 9 7950X Ryzen 9 7900X Ryzen 7 7700X Ryzen 5 7600X
$699 $549 $399 $299

AMD Ryzen 7000 processors with the company’s new 3D V-Cache are going to be available later in 2022, but there’s no specific date yet.

The post AMD Ryzen 7000 launch date is official, promises to be the best gaming chip appeared first on XDA.


from XDA https://ift.tt/6YgUKts
via IFTTT