Over the past few years, voice assistants have become quite common in households. Of course, all modern phones come with one in-built, plus smart speakers too have gained popularity. A Nest speaker, an Amazon Echo, or an Apple Homepod can be found in quite a lot of households these days. While it’s extremely convenient to use your voice to perform tasks, one of the biggest concerns with an always-on mic is privacy. These assistants listen to you and store your queries to improve accuracy and while that may sound beneficial, you may not want certain sensitive data to be saved. This is why deleting your assistant’s voice history from time to time is a good idea. Here’s how you can delete your voice history from Alexa, Google Assistant, and Siri using a few simple steps.
Note that the steps vary depending on the voice assistant you use. Some devices will let you erase your voice history via the speaker itself, while some may require you to do it via the app on your smartphone. We will mention all possible ways so you can follow the one that’s convenient to you.
Navigate this article:
- How to delete voice history from Amazon Alexa
- How to Delete Voice History from Google Assistant
- How to Delete Voice History from Siri
How to Delete Voice History from Amazon Alexa

Amazon’s voice assistant — Alexa — is quite popular and can be very helpful too if you own an Echo speaker or device. It even comes pre-installed on Amazon’s Fire TV sticks. When you use Alexa on your Echo device or even on your smartphone, it stores your search queries and then uses it to learn and improve the way it responds to you. If you want to delete your voice history on Alexa, this is what you need to do.
Delete Alexa Voice History from your Smartphone
- Open the Alexa app on your smartphone. These steps are valid on both Android and iOS devices.
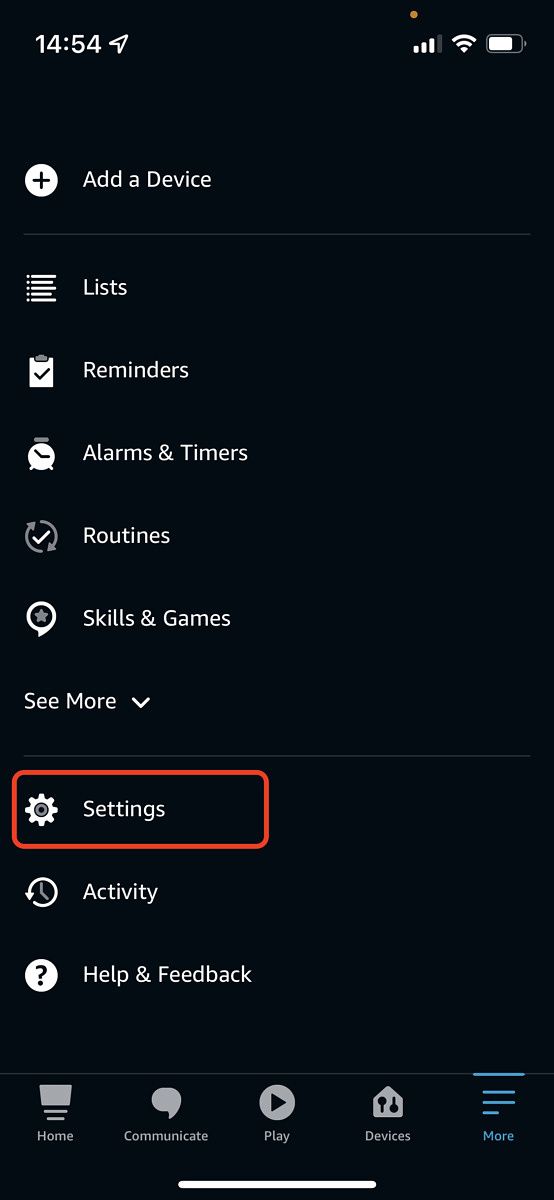
- Select the More tab at the bottom of the screen and then go to Settings.

- Now, tap on the Alexa Privacy option.

- Choose the Review Voice History tab. Here, you can filter your voice history based on the date range.

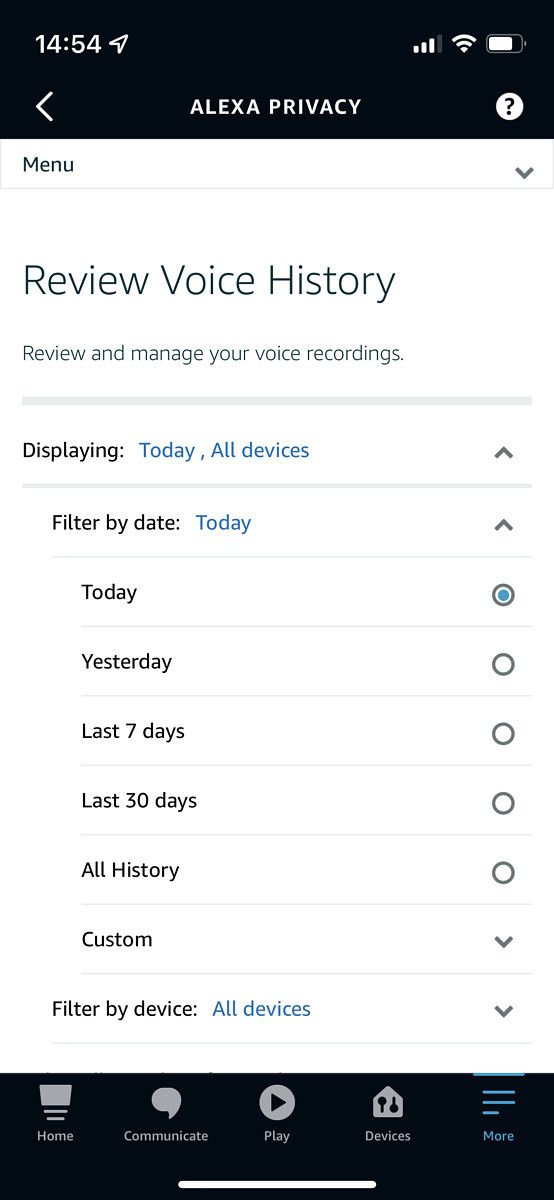
- Once you’ve selected your preferred date range, you can view your Alexa history.
- You can manually delete selected recordings from this screen by tapping on the small arrow and selecting Delete Recording.

- If you wish to delete the entire history, select the Delete all of my recordings option.
Delete Alexa Voice History from an Echo Speaker/device
Before you can delete your Alexa voice history directly from the speaker, you will have to enable the option for the first time.
- Open the Alexa app on your smartphone. These steps are valid on both Android and iOS devices.
- Select the More tab at the bottom of the screen and then go to Settings.
- Now, tap on the Alexa Privacy option.
- Choose the Manage Your Alexa Data tab.

- Here, toggle the Enable deletion by voice option on and hit Confirm.

- Once you’ve enabled this, you can ask Alexa via your voice to delete your history.
- You can say commands like:
- “Alexa, Delete what I just said.”
- “Alexa, Delete everything I said today.”
- “Delete my entire voice history.”
Set Alexa Voice History to Auto-delete
If you wish for your Alexa voice history to be automatically deleted once every few months or you don’t want it to be saved at all, you can also do that from the Alexa app.
- Open the Alexa app on your smartphone. These steps are valid on both Android and iOS devices.
- Select the More tab at the bottom of the screen and then go to Settings.
- Now, tap on the Alexa Privacy option.
- Choose the Manage Your Alexa Data tab.
- Select the Choose how long to save recordings option.

- Here, you can select the desired duration for auto-deletion or select Do not save recordings if that’s what you want.
How to Delete Voice History from Google Assistant

Google Assistant is undoubtedly one of the most common voice assistants out there for the simple fact that it comes pre-installed on all Android devices. Nest speakers and devices are also quite common and are often considered better than Echo devices in terms of the tasks they can perform. Regardless of whether you use Google Assistant on your smartphone, TV, or a Nest speaker, here’s how you can delete your voice history.
Delete Google Assistant Voice History from your Smartphone
- Head over to the Google Assistant Activity page on your smartphone and sign in to your Google account.

- Here, you will be able to see your Google Assistant queries that you can sort by date.

- You can either delete each entry individually or select the Delete option below the search bar to delete your entire history.

- Select the date range for which you wish to delete your search history and you’re done.
Delete Google Assistant Voice History with your Voice
You can directly use your voice to give certain commands and delete voice history on any device that has the Google Assistant including your smartphone or a Nest speaker. The commands can be as follows:
- “Hey Google, delete my last conversation.”
- “Hey Google, delete today’s activity.”
- “Hey Google, delete this week’s activity.”
- “Hey Google, that wasn’t for you” to delete the last thing you said.
Set Google Assistant Voice History to Auto-delete
- Head over to the Google Assistant Activity page on your smartphone and sign in to your Google account.
- Select the Delete option below the search bar.
- Now, select the Set up automatic deletions option.
- You will then be asked to select the duration for which you want to enable auto-deletion. You can choose from 3 months, 18 months, or 36 months.

- Choose the relevant option and select Next. You’ll be asked to confirm the deletion and you’re done.
How to Delete Voice History from Siri

If you use any of Apple’s products, Siri comes integrated into the OS. This includes the iPhone, iPad, iPod, Mac, and even the Apple Watch. If you wish to delete your Siri voice history, there’s just one way to do it and that’s via the Siri settings on your device. You cannot use your voice to delete your Siri voice history via a HomePod.
Delete Siri Voice History from your iPhone or iPad
- Go to the Settings app on your iPhone or iPad and scroll down to find Siri & Search.

- Under this setting, you’ll find the Siri & Dictation History option.

- Tap on it and you will find an option to Delete Siri & Dictation History.

- Select the option and you will be asked to confirm the process. That’s pretty much it.
Delete Siri Voice History from your Mac
- Click on the Apple logo on the top left corner of your Mac and select System Preferences.
- Now, click on Siri which will lead you to Siri settings.

- Select the Delete Siri & Dictation History option next to Siri History.

- You will be asked for confirmation. Select Delete and you’re done.
Delete Siri Voice History on a HomePod
As mentioned earlier, you cannot delete your Siri voice history directly from a HomePod. You will have to do it via the Home app on your iPhone.
- Open the Home app on your iPhone.
- Press and hold the HomePod icon to bring up its settings.
- You’ll find the Siri History option.
- Select Delete Siri History and you’re good to go.
Unlike the other two assistants, you cannot set Siri voice data to auto-delete after a certain time interval. You will have to delete the data manually from time to time.
As you can see, deleting your assistant’s voice history is quite straightforward and only involves a few easy steps. It’s a good idea to delete your history from time to time for privacy concerns or just to make sure there’s no sensitive data that’s being sent to the company’s servers.
If you’re concerned about your online privacy, you might want to consider taking additional steps like turning on auto-delete for your Google data or deleting your Facebook account. Some browser extensions can also snoop on your data so it’s wise to delete the extensions you don’t use.
The post How to delete voice history from Amazon Alexa, Google Assistant, and Apple’s Siri appeared first on xda-developers.
from xda-developers https://ift.tt/3emKr2d
via IFTTT