LightBlog

samedi 6 novembre 2021

How to easily sideload apps on any iPhone using AltStore

Apple’s iPhones are pretty famous for being closed off, with jailbreaking being the only way that most people can imagine for sideloading apps. However, there are other ways to sideload apps onto an iPhone, and the easiest way is through AltStore.

AltStore is, as the name implies, an alternative app store for iOS devices. Made by Riley Testut, it’s the easiest and safest way to sideload apps on your iPad or iPhone. It doesn’t rely on enterprise certificates that Apple has been cracking down on, and instead makes use of a feature Apple introduced that lets you install up to three apps for free using your Apple ID.

If you’re interested, we’re first going to explain how AltStore works, but you can skip to the actual installation part if you don’t care about that!

How AltStore works

AltStore firstly requires an Apple ID and password, but you can create a throwaway account if you don’t trust it. The developer says it’s never sent to any 3rd party server, it’s only sent directly to Apple for authentication, and then stored securely in the device’s keychain so nothing else can retrieve it. However, you would be completely within your rights to still feel uncomfortable with putting your main Apple ID into the app, which is why you can make a throwaway account for the purposes of this tutorial.

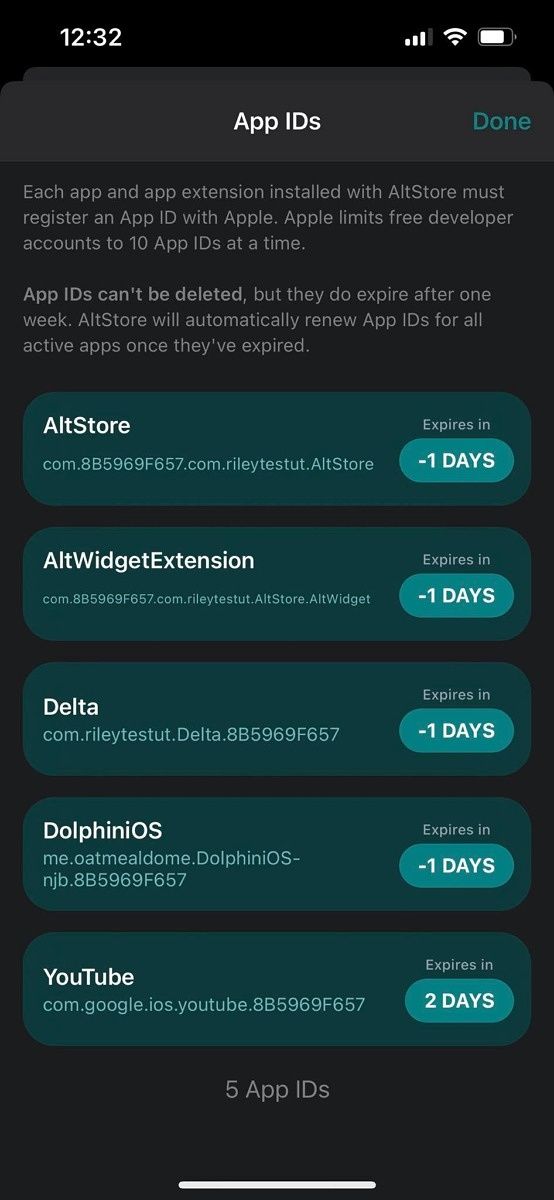
AltStore then signs the application with your Apple ID, so that the app can run. You’ll need to trust your developer certificate in your device settings, but when you do, any apps that you install through AltStore will work… for seven days. Apple has put several restrictions in place to make the process as difficult as possible, but the developer managed to work around those restrictions. As the clock nears closer to the end of the seven-day period, AltStore will refresh the signing key on the app so that you can get an extra seven days of usage out of it. This can also run in the background.

However, AltStore relies on a computer on the same network running AltServer, and you’ll need both iTunes and iCloud installed on that computer, too. AltServer is a companion app that sits and waits for AltStore connections, and apps can only be installed and refreshed via AltServer.

The reason AltServer is necessary is thanks to limitations placed on free Apple developer accounts. Apps can’t be distributed with a free Apple ID over the air. This means apps can’t be installed locally, but they can be installed using iTunes Wi-Fi sync. AltServer is also required to install AltStore initially, but once it’s installed, AltStore can send commands to AltServer for app installation. All you need to ensure is that you’re on the same network.

Installing AltStore

You’ll need a Windows or Mac machine to install AltStore on your iOS device. You’ll also need to install iTunes and iCloud, and they can’t be from the Windows Store. They need to be downloaded directly from Apple.

Next, you’ll need to download AltServer. You can download AltServer from AltStore’s website.

Download AltServer

Once installed, connect your iPhone to your computer. You’ll need to “trust” the computer you plugged it into, and that prompt will show up on the iPhone. Next, launch AltServer, and leave it running in the background. You’ll need to point it towards your iCloud installation.

Open iTunes, and enable “Sync with this iPhone over Wi-Fi” in your iPhone’s settings.

iTunes wi-fi cloud sync

Once enabled, you can unplug your iPhone from your computer. Click the AltServer icon in the notification area, click “install AltStore”, and choose your phone.

install altstore

You’ll then be prompted to enter your Apple ID and password. You can use a throwaway account as previously mentioned. Wait a little bit, and AltStore should then be installed on your iPhone.

Using AltStore

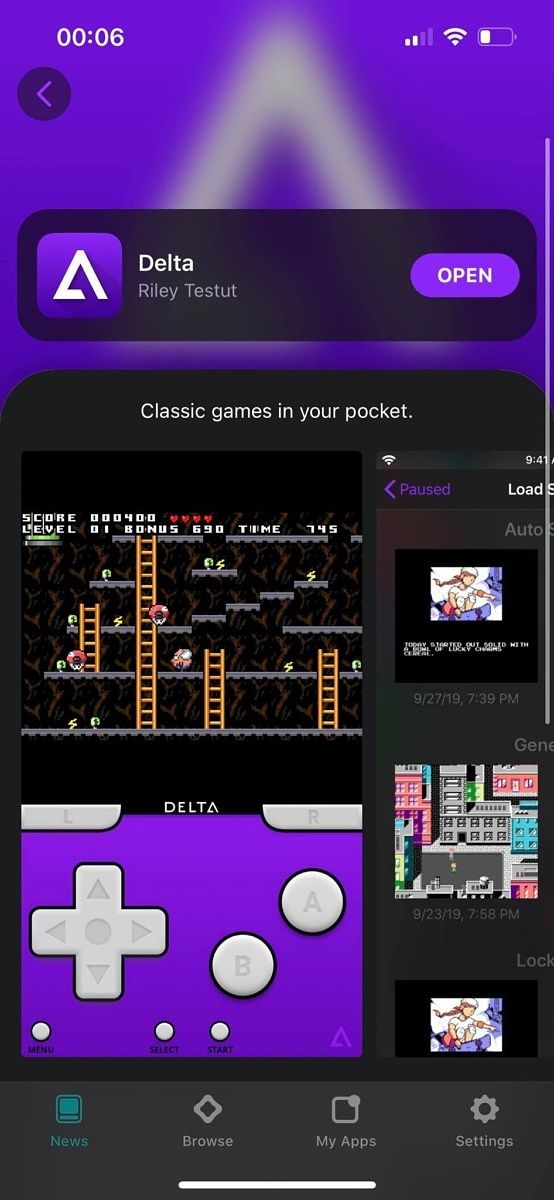
AltStore is a fairly simplistic application. It comes with the ability to install Delta (an emulator) or Clip (a more advanced clipboard manager). You can also install custom IPA files that you download online.

AltStore home AltStore apps list AltStore Delta installer

To install apps, you need to make sure you’re on the same Wi-Fi network as your computer with AltServer running on it. That’s because when you install an app, it needs to be signed and distributed by AltServer. Apps will try to refresh automatically in the background, but it’s luck of the draw if the app tries to refresh in the background or not when you’re on the same network. Testut recommends launching the AltStore app in the background occasionally just to make sure it can check for the local server in the background more often, as your phone will recognize it’s an app that you use frequently.

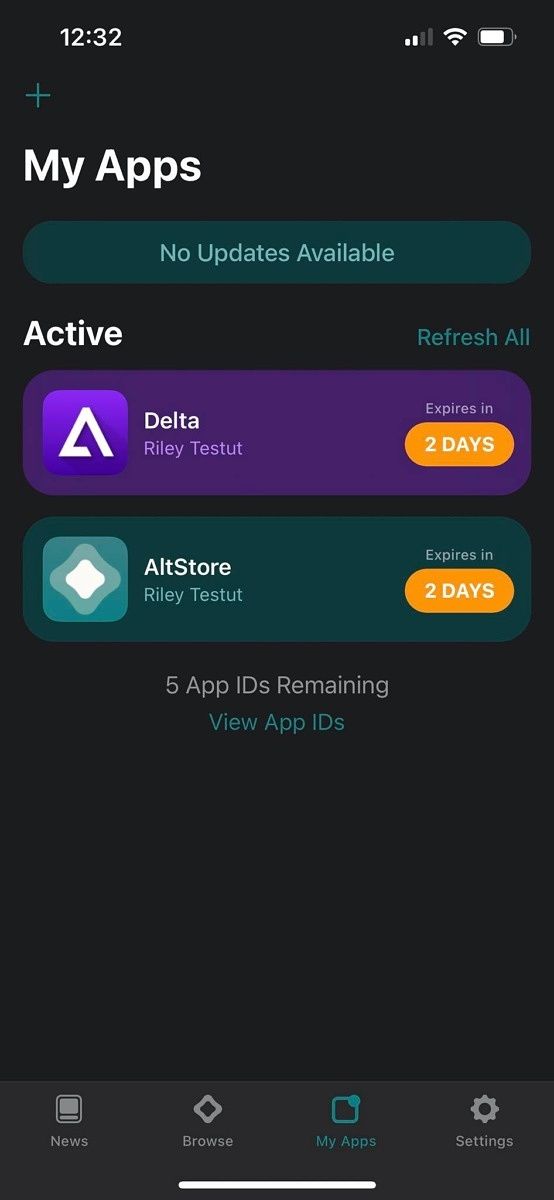
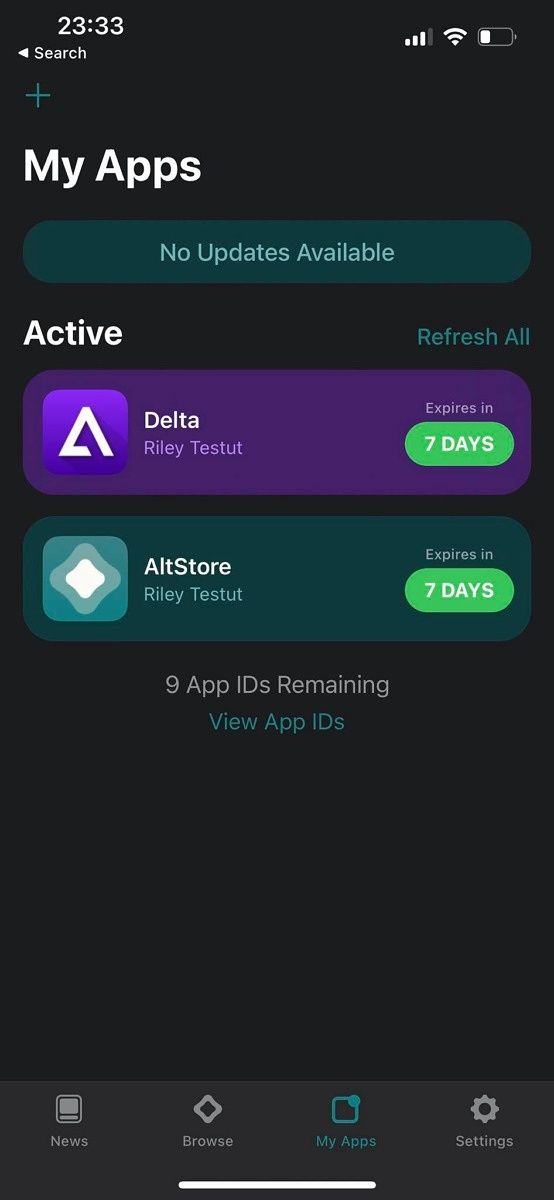
There are a lot of apps you can install and try out, and if you become a patron of Testut’s, you also get access to beta versions of Delta and AltStore. The biggest appeal of becoming a patron is the ability to add third-party sources to AltServer, and you can look them up on Google or on Reddit to find some to add to your iPhone.

I’ve been using Delta from the AltStore to play through Pokemon Fire Red, and I was also messing around with trying to get Dolphin working. Some apps don’t quite work on iOS 15 yet, but a lot of them will likely be updated as time goes on. What custom apps do you use? Let us know in the comments below!

The post How to easily sideload apps on any iPhone using AltStore appeared first on xda-developers.


from xda-developers https://ift.tt/3ERskww
via IFTTT

What is AirPlay: Explaining Apple’s wireless streaming and mirroring technology

AirPlay is one of the easiest ways available to users to stream or mirror content from their Apple devices to a compatible TV, speaker, or Apple TV. This article will explain everything AirPlay can do and how you can use it.

What is AirPlay?

AirPlay streaming

AirPlay is an Apple technology that allows screen mirroring and streaming among devices. Like Chromecast, it works with video and audio content, both available locally on the device and online. And you can stream pretty much everything from photos, videos, presentations, music, and podcasts from iPhone, Mac, iPod touch, or iPad.

As AirPlay is deeply baked into Apple devices and any other device marked as “Work with Apple AirPlay,” the experience is completely seamless, and you don’t need any extra software to make it work.

While the original AirPlay was a one-to-one protocol, allowing streaming from your phone to a speaker or an iPad to a TV, AirPlay 2, introduced in 2018, expanded its capabilities. And now, you can use your Apple device to stream audio to multiple speakers simultaneously. But, unfortunately, you can’t stream a video to multiple devices simultaneously.

AirPlay requires both sender and receiver devices to be on the same Wi-Fi network or connected to the same router using Ethernet. Apple had introduced a feature called Peer-to-Peer AirPlay in 2014, which works even when both devices are not on the same network or any network, but it doesn’t seem to work in all AirPlay operations.

Which devices support AirPlay?

Among the Apple devices, you can use AirPlay on all iPhone, iPod touch, iPad, Mac models from late-2012 or later running the latest version of their operating system. In addition, you can also use AirPlay on iTunes for Windows, but that’s the extent of its Windows support. All these are essentially sender devices, meaning they can initiate a stream or mirroring from them to a receiver device.

Compared to the sender devices, which are primarily from Apple, the AirPlay receivers include:

  • Select smart TVs from LG, Samsung, Sony, and Vizio.
  • Select Roku TVs and  streaming devices
  • Some Fire TV devices
  • Select AV receivers from Arcam, B&O, Bluesound, Bose, B&W, Denon, Integra, JBL, Marantz, Onkyo, Pioneer, Yamaha, and more.
  • HomePod models and select speakers from B&O, Bluesound, Bose, Denon, Harman Kardon, JBL, Philips, Sonos, Yamaha, and more.
  • 2017 or newer models of Macs running macOS Monterey

You can find the complete list of AirPlay-compatible devices on the Apple website. Additionally, you can also identify an AirPlay-compatible device by the “Works with Apple AirPlay” label.

How to use AirPlay to stream and mirror content

AirPlay on Apple Music

As mentioned, AirPlay is useful for a number of things, including streaming movies, videos, music, podcasts. You can also use it to mirror your iPad or iPhone screen and mirror or extend your Mac screen.

How to stream content

  1. When you are looking to stream content from an app on your iPhone, iPad, or Mac, look for the AirPlay icon on the app. Typically you’ll find it right next to the playback controls. However, you may have to go to options or the share menu to get it in some cases.
  2. Tap on the AirPlay button, and the Apple device will show a list of compatible devices around you. Pick the device on which you want to AirPlay the content, and you are good to go.
  3. When you want to stop the AirPlay, tap on the icon again and select the device you are using.

The same instructions work when you want to AirPlay content using iTunes on Windows. In addition, if you are trying to stream audio but don’t see an AirPlay button in the app, you can also use Control Center to trigger AirPlay to compatible speakers. If your speakers are AirPlay 2 compatible, you’ll be able to stream audio on multiple speakers simultaneously.

How to mirror content

Mirroring Mac display on Apple TV

  1. To mirror your iPhone, iPad, or Mac screen on Apple TV or an AirPlay 2-compatible smart TV, open the Control Center on your device and tap on the Screen Mirroring icon. If you are using an older macOS version, instead of a Screen Mirroring icon in the Control Center, you’ll have to click on the AirPlay icon in the menu bar. If you don’t see the AirPlay icon, you’ll have to go to System Preferences > Displays and enable the “Show mirroring options in the menu bar when available” option.
  2. Once you have clicked on the Screen Mirroring or AirPlay icon, your device will show a list of compatible displays around, and you can choose the one on which you want to mirror the screen.
  3. If your AirPlay-compatible screen shows a passcode, enter that passcode on your original device.
  4. Once mirroring has started, you can tap on the Screen Mirroring icon for more options, including using your TV to extend the Mac display.

Limitations

While AirPlay does what it’s supposed to do pretty well, it has some limitations as well. For example, you can only use AirPlay from one app on your Apple device at a time. So you can’t simultaneously AirPlay a movie from the Apple TV app to your TV and AirPlay a song from Apple Music to a speaker.

As mentioned, AirPlay is limited to Apple devices. Even though some workarounds and hacks exist for other platforms, they are time-consuming and typically not worth the effort.


As you can see, AirPlay is a versatile wireless streaming and mirroring tool for Apple device users. If you are a part of the Apple ecosystem, there is no better option than AirPlay to cast or mirror content from your device. In addition, over the years, Apple has continued to expand the AirPlay feature-set, so it doesn’t feel stagnant and is evolving to fulfill user needs.

Do you use AirPlay on your Apple devices? How has your experience been with it? Let us know in the comments section. We also have similar explainers on Miracast and Chromecast.

The post What is AirPlay: Explaining Apple’s wireless streaming and mirroring technology appeared first on xda-developers.


from xda-developers https://ift.tt/3bSycc5
via IFTTT

XDA Basics: How to connect AirPods to a Mac

Apple’s computer lineup has a device that matches each and everyone’s needs. If you’re unsure which one to get, make sure to check our list of the best Macs currently available. If you decide to go for the MacBook Pro 2021, don’t forget to protect it with a case. While Macs still feature a headphone jack, some of us prefer going for the wireless option. Here’s how to connect AirPods to a Mac.

The easy, automatic way

  • Open the lid of your AirPods case.
  • Bring your iPhone close, and ensure Bluetooth is turned on.
  • Hit Connect on the pairing popup.
  • Wait for the pairing process to complete.
  • Make sure both your iPhone and Mac are connected to the internet and same Apple ID.
  • Your AirPods should appear in your Mac’s paired Bluetooth devices list automatically.

The manual way

If you don’t use an iPhone/iPad to take advantage of the automatic pairing feature, then follow the steps below:

change password on macOS Mac 1

  • Launch the System Preferences app from Launcher, Spotlight Search, or the Apple logo menu.

bluetooth preferences macos

  • Head to Bluetooth preferences.
  • Open the lid of your AirPods case.

macos-monterey-system-preferences-bluetooth-connect-airpods

  • Click on the Connect button you see next to the AirPods in the list of devices.
  • Voila! You can now listen to audio on your Mac through your AirPods.

audio output macOS

  • If your Mac still plays audio through its speakers after you connect to your AirPods, make sure AirPods are selected as the audio output from the Control Center.

Using AirPods has several advantages, such as listening to music in Spatial audio with head tracking. That is in addition to Active Noise Cancellation on supported models and Hey Siri support. AirPods were first introduced with the iPhone 7’s launch, which is the first iPhone to drop the headphone jack. Apple has since then released the AirPods 2nd and 3rd Gen, in addition to the AirPods Pro and Max.

Which AirPods are you using with your Mac? Let us know in the comments section below.

The post XDA Basics: How to connect AirPods to a Mac appeared first on xda-developers.


from xda-developers https://ift.tt/3CT64S3
via IFTTT

vendredi 5 novembre 2021

The Pixel 6 series might not actually charge at 30W

The Google Pixel 6 series was recently launched, and it features a refreshed design, upgraded camera hardware, Google’s in-house Tensor SoC, the latest version of Android, and much more. It’s likely the best Pixel device in a long, long time, but it’s also been plagued with issues. There are a number of Material You problems, along with reports of a slow fingerprint scanner too and ghost-dialing problems. However, now there’s yet another issue — the Pixel 6 series might not even charge at 30W, despite Google selling a 30W charger that launched alongside the phone.

Reports on the XDA forums along with an investigation by Android Authority seem to confirm that the Pixel 6 Pro is incapable of charging at 30W. The problem is that Google has never actually said that the Pixel 6 series charges at 30W, instead, it sells a separate 30W charger and doesn’t include a charger in the box. Reviewers didn’t get a 30W charger from Google, but I charged my device with the OnePlus 9 Pro’s in-box 65W charger, as it’s USB PD compliant. It charged up to 50% in half an hour which meant that it had reached what Google considered peak charging speed, but it seems that from Android Authority’s investigation, peak speed isn’t actually 30W.

Here’s the thing though — Google never actually said that the Pixel 6 series will charge at 30W. Instead, the company launched a charger with the Pixel 6 series that can charge at 30W, and then said the following at the bottom of the store page:

Fast wired charging rates are based upon use of the Google 30 W USB-C® Charger plugged into an electrical socket.  Compatible with USB-PD 3.0 PPS adaptors. Actual results may be slower. Adaptors sold separately. Charging speed based upon testing with device batteries drained to 1% and charged with Google 30 W USB-C® Charger; sold separately. Charging testing conducted by Google in mid-2021 on pre-production hardware and software using default settings with the device powered on. Charging speed depends upon many factors, including usage during charging, battery age and ambient temperature. Actual charging speed may be slower.

In fact, Android Authority’s investigation found that it maxes out at 22W up until 50%, but maintains a 13W average over the entire charging cycle. The Google Pixel 6 series seems to charge in just under 2 hours to 100%, yet it takes half an hour to charge to 50%. In other words, it takes nearly three times as long to get from 50% to 100% than from 1% to 50%. After 50%, the phone seems to hit 15W at around 62% battery capacity. After that, it falls to 12W at 75% capacity. Finally, it then reaches 85% charge and the power falls as low as 2.5W by the time the battery is full.

The slow charging speed of the Pixel 6 series is a tough pill to swallow. While I generally respect the dedication to a single standard in the support of USB Power Delivery, it’s a bit of a difficult switch. It’s usable, but don’t be expecting to toss this on the charger for 10 or 15 minutes and get a whole day’s use of battery out of it. It does get a little bit warm when it’s charging, but it’s not uncomfortably hot. The problem as well is that especially at a higher battery percentage, there’s clearly a lot of room for it to have a higher charging speed without impact on thermals. There likely isn’t a whole that Google can actually do about the situation, but releasing a 30W charger for a phone that can’t even reach 30W is a bit weird and might give users the wrong impression that it charges faster than it actually does.

The post The Pixel 6 series might not actually charge at 30W appeared first on xda-developers.


from xda-developers https://ift.tt/3CQy60P
via IFTTT

The Pixel 6 series might not actually charge at 30W

The Google Pixel 6 series was recently launched, and it features a refreshed design, upgraded camera hardware, Google’s in-house Tensor SoC, the latest version of Android, and much more. It’s likely the best Pixel device in a long, long time, but it’s also been plagued with issues. There are a number of Material You problems, along with reports of a slow fingerprint scanner too and ghost-dialing problems. However, now there’s yet another issue — the Pixel 6 series might not even charge at 30W, despite Google selling a 30W charger that launched alongside the phone.

Reports on the XDA forums along with an investigation by Android Authority seem to confirm that the Pixel 6 Pro is incapable of charging at 30W. The problem is that Google has never actually said that the Pixel 6 series charges at 30W, instead, it sells a separate 30W charger and doesn’t include a charger in the box. Reviewers didn’t get a 30W charger from Google, but I charged my device with the OnePlus 9 Pro’s in-box 65W charger, as it’s USB PD compliant. It charged up to 50% in half an hour which meant that it had reached what Google considered peak charging speed, but it seems that from Android Authority’s investigation, peak speed isn’t actually 30W.

Here’s the thing though — Google never actually said that the Pixel 6 series will charge at 30W. Instead, the company launched a charger with the Pixel 6 series that can charge at 30W, and then said the following at the bottom of the store page:

Fast wired charging rates are based upon use of the Google 30 W USB-C® Charger plugged into an electrical socket.  Compatible with USB-PD 3.0 PPS adaptors. Actual results may be slower. Adaptors sold separately. Charging speed based upon testing with device batteries drained to 1% and charged with Google 30 W USB-C® Charger; sold separately. Charging testing conducted by Google in mid-2021 on pre-production hardware and software using default settings with the device powered on. Charging speed depends upon many factors, including usage during charging, battery age and ambient temperature. Actual charging speed may be slower.

In fact, Android Authority’s investigation found that it maxes out at 22W up until 50%, but maintains a 13W average over the entire charging cycle. The Google Pixel 6 series seems to charge in just under 2 hours to 100%, yet it takes half an hour to charge to 50%. In other words, it takes nearly three times as long to get from 50% to 100% than from 1% to 50%. After 50%, the phone seems to hit 15W at around 62% battery capacity. After that, it falls to 12W at 75% capacity. Finally, it then reaches 85% charge and the power falls as low as 2.5W by the time the battery is full.

The slow charging speed of the Pixel 6 series is a tough pill to swallow. While I generally respect the dedication to a single standard in the support of USB Power Delivery, it’s a bit of a difficult switch. It’s usable, but don’t be expecting to toss this on the charger for 10 or 15 minutes and get a whole day’s use of battery out of it. It does get a little bit warm when it’s charging, but again it’s not uncomfortably hot. The problem as well is that especially at a higher battery percentage, there’s clearly a lot of room for it to have a higher charging speed without impact on thermals. There likely isn’t a whole that Google can actually do about the situation, but releasing a 30W charger for a phone that can’t even reach 30W is a bit weird and might give users the wrong impression that it charges faster than it actually does.

The post The Pixel 6 series might not actually charge at 30W appeared first on xda-developers.


from xda-developers https://ift.tt/3CQy60P
via IFTTT