LightBlog

mardi 18 août 2020

Netflix adds multiple Samsung Galaxy and TCL phones to its list of HD and HDR capable devices

In order to stream videos in HD resolution from popular streaming apps like Netflix and Amazon Prime Video, your smartphone needs to have Widewine L1 certification. However, despite Widewine L1 certification, some devices aren’t able to stream HD content on Netflix because the platform also has to manually whitelist devices to enable HD playback support. Over the last few months, Netflix has whitelisted several Samsung devices for HD and HDR10 support. Most recently, the company added the ASUS ZenFone 6, the ASUS ROG Phone II, and TCL 10 series to its HD/HDR supported list. Now, the company has added several more Samsung and TCL devices to the list.

New HD compatible devices:

  • Samsung Galaxy A21s (SM-A217F, SM-A217M, SM-A217N)
  • Samsung Galaxy A31 (SM-A315F, SM-A315G, SM-A315N)
  • Samsung Galaxy A41 (SM-A415F, SM-A415D, SGH-N582, SC-41A, SM-A415J, BKM, SCV48)
  • Samsung Galaxy A51 5G (SM-A516N, SM-A5160, SM-A516B, SM-A516U, SM-A516U1, SM-A516V, SM-A516D, SGH-N804, SC-54A, SM-A516J, DMO, SCG07)
  • Samsung Galaxy A71 5G (SM-A716B, SM-A716S, SM-A7160, SM-A716U, SM-A716U1, SM-A716V)
  • Samsung Galaxy M31s (SM-M317F)
  • Samsung Galaxy Note 20 (SM-N981B, SM-N981BR, SM-N980F, SM-N981U, SM-N981U1, SM-N981N, SM-N981W, SM-N9810)
  • Samsung Galaxy Note 20 Ultra (SM-N986B, SM-N986BR, SM-N985F, SM-N986U, SM-N986U1, SM-N986D, SGH-N323, SC-53A, SM-N986J, ERF, SCG06, SM-N986C, SGH-N219, SM-N986N, SM-N986W, SM-N9860)
  • Samsung Galaxy Tab A7 (SM-T500, SM-T500X, SM-T505, SM-T505C, SM-T505N, SM-T505U, SM-T507)
  • Samsung Galaxy Tab S7 (SM-T870, SM-T875, SM-T875N, SM-T878U)
  • Samsung Galaxy Tab S7+ (SM-T970, SM-T975, SM-T975N, SM-T976B, SM-T976N, SM-T978U)
  • Samsung Galaxy Z Flip 5G (SM-F707B, SM-F707J, GTH, SCG04, SM-F707N, SM-F707U, SM-F707U1, SM-F707W, SM-F7070, SM-F7070Y)
  • Samsung Galaxy Z Fold 2 (SM-F916B, SM-F916N, SM-F916U, SM-F916U1, SM-F916W, SM-F9160, SM-F916J, FSG, SCG05, SM-F916D, SM-F916Q, SM-W2021)
  • TCL 10 5G (T790Y, T790H)
  • TCL 10 Plus (T782H)

New HDR10 compatible devices:

  • Samsung Galaxy Note 20 (SM-N981B, SM-N981BR, SM-N980F, SM-N981U, SM-N981U1, SM-N981N, SM-N981W, SM-N9810)
  • Samsung Galaxy Note 20 Ultra (SM-N986B, SM-N986BR, SM-N985F, SM-N986U, SM-N986U1, SM-N986D, SGH-N323, SC-53A, SM-N986J, ERF, SCG06, SM-N986C, SGH-N219, SM-N986N, SM-N986W, SM-N9860)
  • Samsung Galaxy Tab S7+ (SM-T970, SM-T975, SM-T975N, SM-T976B, SM-T976N, SM-T978U)
  • Samsung Galaxy Z Flip 5G (SM-F707B, SM-F707J, GTH, SCG04, SM-F707N, SM-F707U, SM-F707U1, SM-F707W, SM-F7070, SM-F7070Y)
  • Samsung Galaxy Z Fold 2 (SM-F916B, SM-F916N, SM-F916U, SM-F916U1, SM-F916W, SM-F9160, SM-F916J, FSG, SCG05, SM-F916D, SM-F916Q, SM-W2021)
  • TCL 10 5G (T790Y, T790H)
  • TCL 10 Plus (T782H)

In case you have any of the devices mentioned above, you’ll now be able to play videos in HD or HDR10 on Netflix. If you don’t find your device in this list, check out the full list of supported devices by following the source linked below to see if your device has been whitelisted by the platform.


Source: Netflix Help Center

The post Netflix adds multiple Samsung Galaxy and TCL phones to its list of HD and HDR capable devices appeared first on xda-developers.


from xda-developers https://ift.tt/3aLdgCR
via IFTTT

[Update: LineageOS 17.1] Unofficial Pixel Experience and TWRP are already available for the new OnePlus Nord

Update 1 (08/18/2020 @ 02:56 AM ET): Unofficial LineageOS 17.1 has also landed on the OnePlus Nord. Scroll to the bottom for more information. The article as published on August 13, 2020, is preserved below.

Third-party development for the OnePlus Nord is on full-swing on our forums, even though it’s just been over a week since the device went on sale. XDA Senior Member Some_Random_Username has already released a guide to root the device using Magisk and now, developers have released unofficial builds of the Pixel Experience custom ROM and TWRP custom recovery for the device.

OnePlus Nord XDA Forums

How to Root the OnePlus Nord with Magisk

Unofficial TWRP recovery for the OnePlus Nord

XDA Recognized Developer mauronofrio has released an unofficial build of the TWRP custom recovery (v3.4.0-0) for the OnePlus Nord. You can download and flash the custom recovery on your device by following the instruction in the XDA forums thread linked below, after which you’ll be able to flash a custom ROM on the device. However, since this is an early build of the TWRP recovery, some features don’t work as expected. Here’s a list of all the things that you can and can’t do with the current version of TWRP:

  • TWRP boots
  • Decryption works
  • ROM flashing should work
  • Backups are broken
  • Flash partition is broken for system and vendor
  • Don’t wipe or format system and vendor partitions
  • Format/wipe data is broken

Download Unofficial TWRP (v3.4.0-0)

Unofficial Pixel Experience ROM

An unofficial build of the Android 10-based Pixel Experience ROM is now also available for the OnePlus Nord, thanks to XDA Member CryllicBuster273. To install the ROM, you’ll first need to root your OnePlus Nord by following the guide linked above and flash the unofficial TWRP recovery on the device. Then you can follow the instructions in the XDA forum thread linked below to download and flash the ROM. The custom ROM comes with Google apps built-in, so you don’t need to flash a separate GApps package after flashing the ROM.

Download Unofficial Pixel Experience ROM

Unofficial LineageOS 17.1

XDA Recognized Developer lakshay18 has also brought an unofficial build of LineageOS 17.1 to the OnePlus Nord. To install the ROM, you need to be on the latest OxygenOS and then follow the steps mentioned for a fastboot installation as opposed to an installation through TWRP or a different custom recovery.

Download Unofficial LineageOS 17.1 ROM

The post [Update: LineageOS 17.1] Unofficial Pixel Experience and TWRP are already available for the new OnePlus Nord appeared first on xda-developers.


from xda-developers https://ift.tt/2CoVjx5
via IFTTT

lundi 17 août 2020

These Samsung Galaxy devices will get 3 generations of Android updates

Android updates have long been a problem point for the OS. There is an incredible variety of Android devices out there, and ensuring that these get updated to the latest Android version is a big challenge that Google has attempted to tackle through multiple measures (notably, Project Treble) in the past. And while the entire ecosystem still has some ways to go on this road, Samsung is improving the overall update situation by promising support for three generations of Android OS on several Galaxy devices.

Samsung had recently surprised a lot of people when it announced that the newly announced Galaxy Note 20 and Galaxy Note 20 Ultra would be updated with “three generations of Android OS“. Samsung is now extending the promise to these devices:

  • Galaxy S series:
    • Galaxy S20 Ultra 5G
    • Galaxy S20 Ultra
    • Galaxy S20+ 5G
    • Galaxy S20+
    • Galaxy S20 5G
    • Galaxy S20
    • Galaxy S10 5G
    • Galaxy S10+
    • Galaxy S10
    • Galaxy S10e
    • Galaxy S10 Lite
    • Upcoming S series devices
  • Galaxy Note series:
    • Galaxy Note 20 Ultra 5G
    • Galaxy Note 20 Ultra
    • Galaxy Note 20 5G
    • Galaxy Note 20
    • Galaxy Note 10+ 5G
    • Galaxy Note 10+
    • Galaxy Note 10 5G
    • Galaxy Note 10
    • Galaxy Note 10 Lite
    • Upcoming Note series devices
  • Galaxy Foldable devices:
    • Galaxy Z Fold 2 5G
    • Galaxy Z Fold 2
    • Galaxy Z Flip 5G
    • Galaxy Z Flip
    • Galaxy Fold 5G
    • Galaxy Fold
    • Upcoming Z series devices
  • Galaxy A series:
    • Galaxy A71 5G
    • Galaxy A71
    • Galaxy A51 5G
    • Galaxy A51
    • Galaxy A90 5G
    • Select upcoming A series devices
  • Tablets:
    • Galaxy Tab S7+ 5G
    • Galaxy Tab S7+
    • Galaxy Tab S7 5G
    • Galaxy Tab S7
    • Galaxy Tab S6 5G
    • Galaxy Tab S6
    • Galaxy Tab S6 Lite
    • Upcoming Tab S series devices

Samsung further clarifies what it means under this promise with an example of the Galaxy S20 series. The Galaxy S20, announced in February 2020 with Android 10, will get support for three OS upgrades starting with Android 11. This means that the Galaxy S20 will get updated to Android 13. Further, Samsung has also announced that the Galaxy S20 lineup will also be the first Galaxy devices to receive the Android 11 upgrade later this year.

The list of upgradeable devices is decently long, but one can notice that most of these are flagships. But to be fair, a bunch of these phones are not from the latest generation of flagships, and the list also includes several A-series devices.

For other Galaxy devices, Samsung is “committed to providing the latest Android OS upgrades until the hardware specifications allow to provide the optimized mobile experience for our users“. Samsung also surprised us when we inquired on the Galaxy M31s update promise, by promising security updates for 4 years in total. We’ve reached out to Samsung for more details on the OS update promise outside of the phones mentioned in the above list, and on the security update promise.


Source: Samsung

The post These Samsung Galaxy devices will get 3 generations of Android updates appeared first on xda-developers.


from xda-developers https://ift.tt/2E2ciWJ
via IFTTT

These Samsung Galaxy devices will get 3 generations of Android updates

Android updates have long been a problem point for the OS. There is an incredible variety of Android devices out there, and ensuring that these get updated to the latest Android version is a big challenge that Google has attempted to tackle through multiple measures (notably, Project Treble) in the past. And while the entire ecosystem still has some ways to go on this road, Samsung is improving the overall update situation by promising support for three generations of Android OS on several Galaxy devices.

Samsung had recently surprised a lot of people when it announced that the newly announced Galaxy Note 20 and Galaxy Note 20 Ultra would be updated with “three generations of Android OS“. Samsung is now extending the promise to these devices:

  • Galaxy S series:
    • Galaxy S20 Ultra 5G
    • Galaxy S20 Ultra
    • Galaxy S20+ 5G
    • Galaxy S20+
    • Galaxy S20 5G
    • Galaxy S20
    • Galaxy S10 5G
    • Galaxy S10+
    • Galaxy S10
    • Galaxy S10e
    • Galaxy S10 Lite
    • Upcoming S series devices
  • Galaxy Note series:
    • Galaxy Note 20 Ultra 5G
    • Galaxy Note 20 Ultra
    • Galaxy Note 20 5G
    • Galaxy Note 20
    • Galaxy Note 10+ 5G
    • Galaxy Note 10+
    • Galaxy Note 10 5G
    • Galaxy Note 10
    • Galaxy Note 10 Lite
    • Upcoming Note series devices
  • Galaxy Foldable devices:
    • Galaxy Z Fold 2 5G
    • Galaxy Z Fold 2
    • Galaxy Z Flip 5G
    • Galaxy Z Flip
    • Galaxy Fold 5G
    • Galaxy Fold
    • Upcoming Z series devices
  • Galaxy A series:
    • Galaxy A71 5G
    • Galaxy A71
    • Galaxy A51 5G
    • Galaxy A51
    • Galaxy A90 5G
    • Select upcoming A series devices
  • Tablets:
    • Galaxy Tab S7+ 5G
    • Galaxy Tab S7+
    • Galaxy Tab S7 5G
    • Galaxy Tab S7
    • Galaxy Tab S6 5G
    • Galaxy Tab S6
    • Galaxy Tab S6 Lite
    • Upcoming Tab S series devices

Samsung further clarifies what it means under this promise with an example of the Galaxy S20 series. The Galaxy S20, announced in February 2020 with Android 10, will get support for three OS upgrades starting with Android 11. This means that the Galaxy S20 will get updated to Android 13. Further, Samsung has also announced that the Galaxy S20 lineup will also be the first Galaxy devices to receive the Android 11 upgrade later this year.

The list of upgradeable devices is decently long, but one can notice that most of these are flagships. But to be fair, a bunch of these phones are not from the latest generation of flagships, and the list also includes several A-series devices.

For other Galaxy devices, Samsung is “committed to providing the latest Android OS upgrades until the hardware specifications allow to provide the optimized mobile experience for our users“. Samsung also surprised us when we inquired on the Galaxy M31s update promise, by promising security updates for 4 years in total. We’ve reached out to Samsung for more details on the OS update promise outside of the phones mentioned in the above list, and on the security update promise.


Source: Samsung

The post These Samsung Galaxy devices will get 3 generations of Android updates appeared first on xda-developers.


from xda-developers https://ift.tt/2E2ciWJ
via IFTTT

MediaTek unveils the Dimensity 800U, another mid-range 5G chip for smartphones

MediaTek has just announced the Dimensity 800U, a new mid-range chipset in the company’s Dimensity 800 series. This is the company’s sixth system-on-a-chip with an integrated 5G modem and the sixth chip in the Dimensity series overall.

The Dimensity 800U joins the Dimensity 720Dimensity 800Dimensity 820Dimensity 1000, and Dimensity 1000+ in MediaTek’s lineup of Dimensity SoCs with integrated 5G modems.

Here are some of the key features of the new MediaTek Dimensity 800U:

  • It’s fabricated on a 7nm manufacturing process (TSMC’s 7nm FinFET).
  • It has an octa-core CPU comprised of 2 ARM Cortex-A76 CPU cores clocked at up to 2.4GHz and 6 ARM Cortex-A55 CPU cores clocked at up to 2.0GHz.
  • It features ARM’s Mali-G57 GPU, an independent AI processing unit (APU), supports LPDDR4X RAM (up to 2133MHz), and supports UFS 2.1-class storage.
  • It supports displays at up to Full HD+ resolution and 120Hz refresh rates. MediaTek also says it supports HDR10+ video as well as MediaTek’s custom MiraVision PQ engine with additional HDR optimizations for videos.
  • Its ISP supports up to 64MP image sensors as well as quad camera configurations.
  • It has support for voice on wakeup (VoW), multiple trigger words and voice assistant services, and dual-mic noise reduction technology.
  • Lastly, it has an integrated 5G modem with support for 5G+5G Dual Sim Dual Standby (DSDS), sub-6GHz 5G on SA and NSA networks, dual Voice over New Radio (VoNR), 5G two carrier aggregation (2CC 5G-CA), and MediaTek’s 5G UltraSave technology.

The Dimensity 800 has 4 ARM Cortex-A76 CPU cores clocked at up to 2.0GHz and 4 ARM Cortex-A55 CPU cores clocked at up to 2.0GHz, while the Dimensity 820 has 4 ARM Cortex-A76 CPU cores clocked at up to 2.6GHz and 4 ARM Cortex-A55 CPU cores clocked at up to 2.0GHz. Therefore, the new Dimensity 800U will likely have better single-core performance than the Dimensity 800 but not the Dimensity 820, but it will have worse multi-core performance than both the Dimensity 800 and the Dimensity 820. The Dimensity 800 and Dimensity 820 also have an ARM Mali-G57 GPU like the new 800U, with the 800’s Mali-G57 GPU having 4 cores and the 820’s Mali-G57 GPU having 5 cores. According to MediaTek, the Dimensity 800U features up to 11% faster CPU performance and 28% faster GPU performance compared to the Dimensity 720, which itself has an ARM Mali-G57MC3.

Outside of China, there hasn’t been a single smartphone to launch with a MediaTek Dimensity chipset, although the company recently confirmed that devices with the chipsets will launch outside of China in Q3 2020.

MediaTek Dimensity 800U infographic

An infographic summarizing the key features of the new MediaTek Dimensity 800U. Source: MediaTek.

The post MediaTek unveils the Dimensity 800U, another mid-range 5G chip for smartphones appeared first on xda-developers.


from xda-developers https://ift.tt/34acxcQ
via IFTTT

MediaTek unveils the Dimensity 800U, another mid-range 5G chip for smartphones

MediaTek has just announced the Dimensity 800U, a new mid-range chipset in the company’s Dimensity 800 series. This is the company’s sixth system-on-a-chip with an integrated 5G modem and the sixth chip in the Dimensity series overall.

The Dimensity 800U joins the Dimensity 720Dimensity 800Dimensity 820Dimensity 1000, and Dimensity 1000+ in MediaTek’s lineup of Dimensity SoCs with integrated 5G modems.

Here are some of the key features of the new MediaTek Dimensity 800U:

  • It’s fabricated on a 7nm manufacturing process (TSMC’s 7nm FinFET).
  • It has an octa-core CPU comprised of 2 ARM Cortex-A76 CPU cores clocked at up to 2.4GHz and 6 ARM Cortex-A55 CPU cores clocked at up to 2.0GHz.
  • It features ARM’s Mali-G57 GPU, an independent AI processing unit (APU), supports LPDDR4X RAM (up to 2133MHz), and supports UFS 2.1-class storage.
  • It supports displays at up to Full HD+ resolution and 120Hz refresh rates. MediaTek also says it supports HDR10+ video as well as MediaTek’s custom MiraVision PQ engine with additional HDR optimizations for videos.
  • Its ISP supports up to 64MP image sensors as well as quad camera configurations.
  • It has support for voice on wakeup (VoW), multiple trigger words and voice assistant services, and dual-mic noise reduction technology.
  • Lastly, it has an integrated 5G modem with support for 5G+5G Dual Sim Dual Standby (DSDS), sub-6GHz 5G on SA and NSA networks, dual Voice over New Radio (VoNR), 5G two carrier aggregation (2CC 5G-CA), and MediaTek’s 5G UltraSave technology.

The Dimensity 800 has 4 ARM Cortex-A76 CPU cores clocked at up to 2.0GHz and 4 ARM Cortex-A55 CPU cores clocked at up to 2.0GHz, while the Dimensity 820 has 4 ARM Cortex-A76 CPU cores clocked at up to 2.6GHz and 4 ARM Cortex-A55 CPU cores clocked at up to 2.0GHz. Therefore, the new Dimensity 800U will likely have better single-core performance than the Dimensity 800 but not the Dimensity 820, but it will have worse multi-core performance than both the Dimensity 800 and the Dimensity 820. The Dimensity 800 and Dimensity 820 also have an ARM Mali-G57 GPU like the new 800U, with the 800’s Mali-G57 GPU having 4 cores and the 820’s Mali-G57 GPU having 5 cores. According to MediaTek, the Dimensity 800U features up to 11% faster CPU performance and 28% faster GPU performance compared to the Dimensity 720, which itself has an ARM Mali-G57MC3.

Outside of China, there hasn’t been a single smartphone to launch with a MediaTek Dimensity chipset, although the company recently confirmed that devices with the chipsets will launch outside of China in Q3 2020.

MediaTek Dimensity 800U infographic

An infographic summarizing the key features of the new MediaTek Dimensity 800U. Source: MediaTek.

The post MediaTek unveils the Dimensity 800U, another mid-range 5G chip for smartphones appeared first on xda-developers.


from xda-developers https://ift.tt/34acxcQ
via IFTTT

Android App Basics: How to install Android Studio on Windows, macOS, Linux, and Chrome OS

If you’re just getting started in Android app development, you may or may not know of Android Studio. It’s Google’s official IDE (integrated development environment) made specifically for developing native Android apps. For Java or Kotlin Android apps, there’s no better option in terms of ease of development.

Of course, Android Studio is a development tool, so it’s not exactly a plug-and-play installation for your preferred development platform. There’s a little manual setup required, and that’s where this article comes in. Today, we’re going to go through installing and setting up Android Studio on Windows, macOS, Linux, and Chrome OS. Let’s get started!


Download Android Studio

This may be the most obvious step, but I’m including it here anyway for easy access. Before you can actually use Android Studio, you’ll need to download the appropriate version for your system. Follow the link below and download the appropriate file for your device.

Android Studio Downloads


Install Android Studio

Now comes the fun part. Follow the section below for your operating system to get Android Studio installed.

Windows

Windows actually has a couple of ways to install it.

Method 1

If you just want an easy installation, you can download and run the installer EXE. You’ll be guided through installing Android Studio, and then you’re done!

Just download the EXE and run it.

Method 2

This method is a bit more involved, but if you don’t have administrator access on your computer, this is the better choice. Let’s start.

  1. The first thing to do is to download Android Studio. Grab the ZIP version for Windows.

    Download the ZIP for Windows.

  2. While that’s downloading, make a folder for where you want to store Android Studio. For instance, my installation is located at E:\AndroidStudioDevWin\.
  3. Next, open up the ZIP you downloaded. Inside, you should see a folder called android-studio. Go into that folder and you should see a whole bunch of folders and files, including binjre, and uninstall.exe. These are the files you’re going to extract.

    You should see something similar to this.

  4. Open a new File Explorer window and navigate inside of the folder you created in step 2. In my case, that’s E:\AndroidStudioDevWin\.
  5. Back in the ZIP window, select all the folders and files and drag them to the window you opened in step 4.
    Android Studio on Windows

    Extract the files into the folder you created for Android Studio.

  6. Once the extraction is complete, you can delete the ZIP if you want.
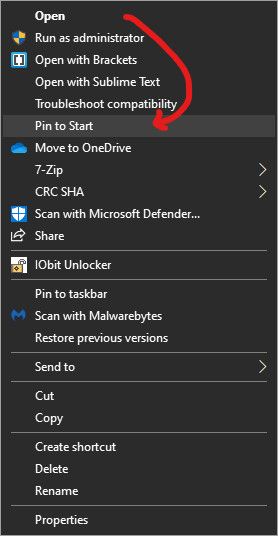
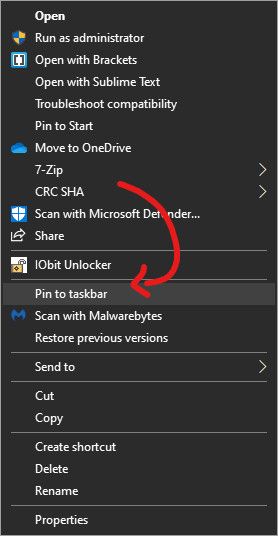
  7. Now, go into the bin directory and find the studio64.exe file. Right-click and choose the Pin to taskbar option. Right-click again and choose the Pin to start option.
    Android Studio on Windows Android Studio on Windows

And that’s it! You should be able to search for “studio” in the Start Menu or simply click on the Android Studio icon in the taskbar to run it.

macOS

Follow these steps to install Android Studio on macOS:

  1. Download the Android Studio DMG for Mac.

    Download the DMG for Mac.

  2. Open the downloaded DMG. A window with the Android Studio icon and a shortcut to the Applications folder should open. If you’ve installed third-party apps on macOS before, this should look pretty familiar.

    You should see something like this when you open the DMG.

  3. Drag the icon to the Applications folder shortcut and let it copy.

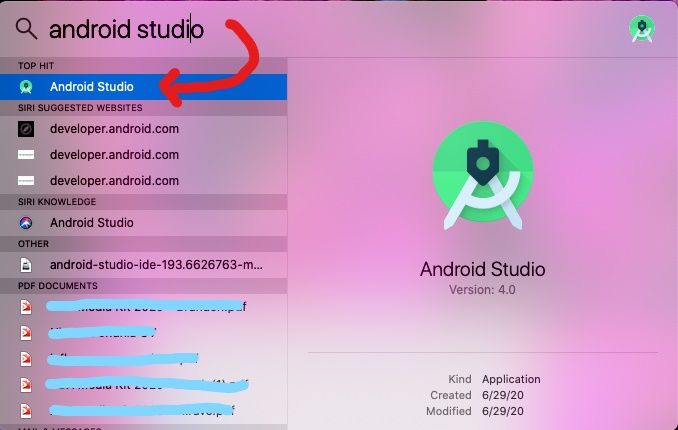
Once the copying has finished, you can open Android Studio by searching for it in Spotlight (CMD+Space) or Launchpad (Fn+F4).
Android Studio on macOS Android Studio on macOS

Linux

There are quite a few Linux distributions out there, and these instructions can’t cover them all. We’re going to be talking specifically about Debian-based and Fedora-based distributions here, but the general instructions should apply to all distributions.

  1. First up, you’ll need to download the Android Studio TAR.GZ for Linux.

    Download the TAR.GZ for Linux.

  2. The second thing you’ll need to do is create a directory where it should be installed. For instance, it could be at /home/zachary/Desktop/AndroidStudio/.
  3. Next, open up the TAR.GZ archive you downloaded. You should see a folder called android-studio. Go into that folder and you should see a whole bunch of folders and files, including binjre, and product-info.json.

    You should see a bunch of files in the ZIP, like this.

  4. Open a new Files window and navigate into the folder you created in step 2. In my case, it’s /home/zachary/Desktop/AndroidStudio/.
  5. Back in the Archive Manager window, select all the folders and files and drag them into the window you opened in step 4. Once the extraction is complete, you can delete the TAR.GZ if you want.
  6. While the files are copying, open a terminal (Ctrl+Alt+T). We need to make sure some libraries are installed so Android Studio can run.
    1. On Debian-based distributions, run:
      sudo apt-get install libc6:i386 libncurses5:i386 libstdc++6:i386 lib32z1 libbz2-1.0:i386
    2. On Fedora-based distributions, run:
      sudo yum install zlib.i686 ncurses-libs.i686 bzip2-libs.i686
    3. On other distributions, you’ll need to find and install these libraries using the appropriate package manager.
  7. Once the extraction is finished, go into the bin directory in your installation directory. Inside, you should see a file named studio.sh.
  8. Right-click on an empty space in the window and choose the Open in Terminal option.

    Choose “Open in Terminal”

  9. Once the terminal window opens, run the following command:
    ./studio.sh

    This will open Android Studio.

Now you’ve got Android Studio installed! If you want to make it easier to open, you can try making a desktop entry. Follow the instructions below to do so.

  1. Right-click on your desktop and choose Open in Terminal.

    Choose “Open in Terminal”

  2. In the terminal window, run:
    touch AndroidStudio.desktop

    Close the terminal.

  3. Open the AndroidStudio.desktop file in a text editor, like Gedit, and paste the following:
    [Desktop Entry]
    Name=Android Studio
    Exec=/home/zachary/Desktop/AndroidStudio/bin/studio.sh
    Icon=/home/zachary/Desktop/AndroidStudio/bin/studio.sh
    Type=Application
    Terminal=False
    Categories=Utility;
  4. You’ll need to change the paths after Exec= and Icon= to match your paths.

    Your desktop entry should look something like this.

  5. Save, and then right-click AndroidStudio.desktop. Choose the Allow Launching option. This may not be necessary for all distributions.
    Install Android Studio on Linux

    Select the “Allow Launching” option.

  6. Finally, double-click the file to launch Android Studio.

Chrome OS

If you’re on Chrome OS or some variant of Chromium OS, you’re in luck, because Google has made Android Studio available through the Linux framework. Read on to find out how to get Android Studio up and running on Chrome OS.

Installing Linux

Before you can install Android Studio on Chrome OS, you’ll need to install Linux. This isn’t a dual-boot situation, though, so don’t worry. Google has added a feature to Chrome OS to run Linux apps without having to install Ubuntu/Arch/etc. and reboot. If you already have Linux on Chrome OS enabled, you can skip this section.

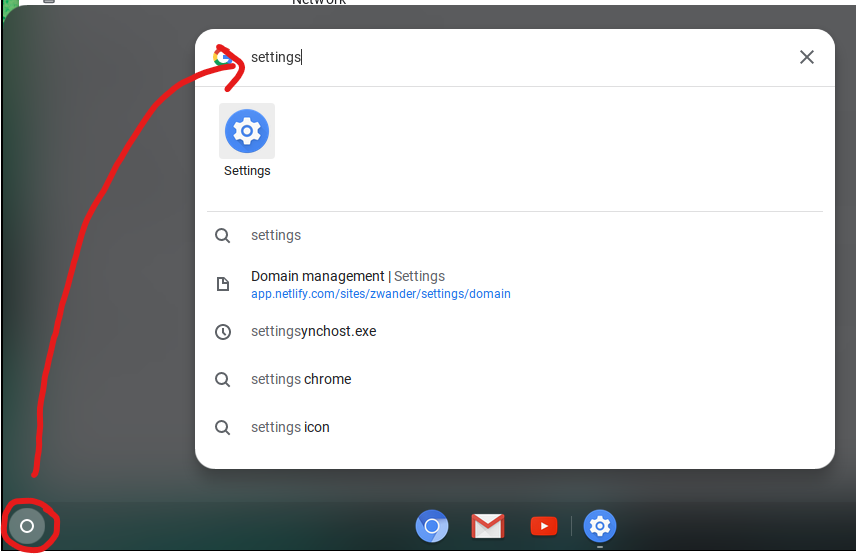
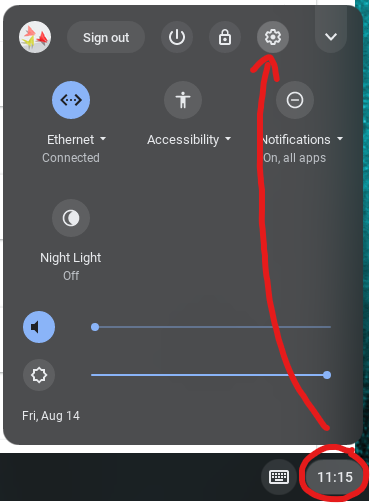
  1. Open Settings. You can do this by clicking the time in the bottom right of the screen and then clicking the gear icon, or by opening search (the circle in the bottom-left) and searching for Settings.
  2. In the left sidebar, click Linux (Beta) or scroll down to the bottom of the Settings window.
  3. Click the Turn on button in the Linux card.

    Click “Turn on” to enable Linux.

  4. At this point, a window should pop up telling you how much space Linux will take up. Click Next.

    Click “Next”.

  5. On the next screen, specify a username for the Linux installation, and then click Install.

    Click “Install”.

  6. Wait a few minutes for the installation to finish. A terminal window will appear. Close it.

If everything went well, you should now have Linux enabled on Chrome OS!

If you don’t see the Linux option in your settings, it likely means your Chromebook doesn’t support it. Most Chromebooks launched in 2019 or later support it, while some launched before 2019 support it. You can find a full list of such devices here.

Installing Android Studio

Now that you have Linux enabled, it’s time to install Android Studio.

  1. Download the Android Studio DEB for Chrome OS.

    Download the DEB for Chrome OS.

  2. Open Files and navigate to the Downloads folder.
  3. Right-click the downloaded DEB and select Install with Linux (Beta).

    Click “Install with Linux”.

  4. In the window that pops up, wait for the details to load, and then click Install.
    Install Android Studio on Chrome OS

    Click “Install”.

  5. You’ll get a notification telling you the progress of the installation. This might take a bit.
  6. Once the installation is finished, you’ll be able to find Android Studio right in the launcher in the Linux apps folder.

    Android Studio will be in your apps launcher inside the “Linux apps” folder.

That’s it! Setting up Android Studio on Chrome OS isn’t exactly simple, but it’s at least fairly straightforward.


Hopefully, this guide helped you get Android Studio set up on whichever operating system you may be using.

The post Android App Basics: How to install Android Studio on Windows, macOS, Linux, and Chrome OS appeared first on xda-developers.


from xda-developers https://ift.tt/323DhJx
via IFTTT